HP switches are designed as “plug and play” devices, allowing quick and easy installation in your network. In its default configuration the switch is open to unauthorized access of various types. When preparing the switch for network operation, therefore, HP strongly recommends that you enforce a security policy to help ensure that the ease in getting started is not used by unauthorized persons as an opportunity for access and possible malicious actions.
Since security incidents can originate with sources inside as well as outside of an organization, your access security provisions must protect against internal and external threats while preserving the necessary network access for authorized clients and users. It is important to evaluate the level of management access vulnerability existing in your network and take steps to ensure that all reasonable security precautions are in place. This includes both configurable security options and physical access to the switch.
Switch management access is available through the following methods:
-
Front panel access to the console serial port, see Physical security
For guidelines on locking down your switch for remote management access, see Using the Management Interface wizard.
Physical access to the switch allows the following:
-
Use of the console serial port (CLI and Menu interface) for viewing and changing the current configuration and for reading status, statistics, and log messages.
-
Use of the switch's USB port for file transfers and autorun capabilities.
-
Use of the switch's Clear and Reset buttons for these actions:
-
clearing (removing) local password protection
-
rebooting the switch
-
restoring the switch to the factory default configuration (and erasing any non-default configuration settings)
-
Keeping the switch in a locked wiring closet or other secure space helps prevent unauthorized physical access.
As additional precautions, you can do the following:
-
Disable or re-enable the password-clearing function of the Clear button.
-
Configure the Clear button to reboot the switch after clearing any local user names and passwords.
-
Modify the operation of the Reset+Clear button combination so that the switch reboots, but does not restore the switch's factory default settings.
-
Disable USB autorun by setting a Manager password, or enable USB autorun in secure mode so that security credentials are required to use this feature.
For the commands used to configure the Clear and Reset buttons, see Configuring front panel security. For information on using USB Autorun, see ”Using USB to transfer files to and from switch” and “Using USB autorun” in the Management and Configuration Guide.
The Management Interface wizard provides a convenient step-by-step method to prepare the switch for secure network operation. It guides you through the process of locking down the following switch operations or protocols:
The wizard can also be used to view the pre-configured defaults and see the current settings for switch access security. The wizard can be launched either via the CLI or the WebAgent.
|
|
|
![[NOTE: ]](images/note.gif) |
NOTE: The wizard's security settings can also be configured using standard commands via the CLI, Menu, or WebAgent. |
|
|
In the default configuration, the switch is open to access by management stations running SNMP, management applications capable of viewing and changing the settings and status data in the switch MIB (Management Information Base). So controlling SNMP access to the switch and preventing unauthorized SNMP access should be a key element of your network security strategy.
The switch supports SNMP versions 1, 2c, and 3, including SNMP community and trap configuration. The default configuration supports versions 1 and 2c compatibility, which uses plain text and does not provide security options.
HP recommends you enable SNMP version 3 for improved security. SNMPv3 includes the ability to configure restricted access and to block all non-version 3 messages (which blocks version 1 and 2c unprotected operation).
Beginning with software release K.12.xx, a management station running an SNMP networked device management application, such as HP PCM+ or HP OpenView, can access the management information base (MIB) for read access to the switch status and read/write access to the switc's authentication configuration (hpSwitchAuth). This means that the switch's default configuration now allows SNMP access to security settings in hpSwitchAuth.
|
|
|
|
|
NOTE: Downloading and booting from the K.12.xx or greater software version for the first time enables SNMP access to the authentication configuration MIB (the default action). If SNMPv3 and other security safeguards are not in place, the switch's authentication configuration MIB is exposed to unprotected SNMP access and you should use the command shown below to disable this access. |
|
|
![[CAUTION: ]](images/caution.gif)
For details on this feature, see Using SNMP to view and configure switch authentication features.
See “Configuring for Network Management Applications” in the Management and Configuration Guide for your switch.
This section explains how port-based security options, and client-based attributes used for authentication, get prioritized on the switch.
Where the switch is running multiple security options, it implements network traffic security based on the OSI (Open Systems Interconnection model) precedence of the individual options, from the lowest to the highest. The following list shows the order in which the switch implements configured security features on traffic moving through a given port.
The above list does not address the mutually exclusive relationship that exists among some security features.
Starting in software release K.13.xx, the Dynamic Configuration Arbiter (DCA) is implemented to determine the client-specific parameters that are assigned in an authentication session.
A client-specific authentication configuration is bound to the MAC address of a client device and may include the following parameters:
-
Untagged client VLAN ID
-
Tagged VLAN IDs
-
Per-port CoS (802.1p) priority
-
Per-port rate-limiting on inbound traffic
-
Client-based ACLs
DCA allows client-specific parameters configured in any of the following ways to be applied and removed as needed in a specified hierarchy of precedence. When multiple values for an individual configuration parameter exist, the value applied to a client session is determined in the following order (from highest to lowest priority) in which a value configured with a higher priority overrides a value configured with a lower priority:
-
Attribute profiles applied through the Network Immunity network-management application using SNMP, see HP E-Network Immunity Manager
Although RADIUS-assigned settings are never applied to ports for non-authenticated clients, the DCA allows configuring and assigning client-specific port configurations to non-authenticated clients, provided that a client's MAC address is known in the switch in the forwarding database. DCA arbitrates the assignment of attributes on both authenticated and non-authenticated ports.
DCA does not support the arbitration and assignment of client-specific attributes on trunk ports.
HP E-Network Immunity Manager (NIM) is a plug-in to HP PCM+ and a key component of the HP E-Network Immunity security solution that provides comprehensive detection and per-port-response to malicious traffic at the HP network edge. NIM allows you to apply policy-based actions to minimize the negative impact of a client's behavior on the network. For example, using NIM you can apply a client-specific profile that adds or modifies per-port rate-limiting and VLAN ID assignments.
|
|
|
|
|
NOTE: NIM actions only support the configuration of per-port rate-limiting and VLAN ID assignment; NIM does not support CoS (802.1p) priority assignment and ACL configuration. |
|
|
NIM-applied parameters temporarily override RADIUS-configured and locally configured parameters in an authentication session. When the NIM-applied action is removed, the previously applied client-specific parameter (locally configured or RADIUS-assigned) is re-applied unless there have been other configuration changes to the parameter. In this way, NIM allows you to minimize network problems without manual intervention.
NIM also allows you to configure and apply client-specific profiles on ports that are not configured to authenticate clients (unauthorized clients), provided that a client's MAC address is known in the switch forwarding database.
The profile of attributes applied for each client (MAC address) session is stored in the hpicfUsrProfile MIB, which serves as the configuration interface for NIM. A client profile consists of NIM-configured, RADIUS-assigned, and statically configured parameters. Using show commands for 802.1X, web or MAC authentication, you can verify which RADIUS-assigned and statically configured parameters are supported and if they are supported on a per-port or per-client basis.
A NIM policy accesses the hpicfUsrProfileMIB through SNMP to perform the following actions:
|
|
|
|
|
NOTE: The attribute profile assigned to a client is often a combination of NIM-configured, RADIUS-assigned, and statically configured settings. Precedence is always given to the temporarily applied NIM-configured parameters over RADIUS-assigned and locally configured parameters. |
|
|
For information on NIM, go to the HP Networking Web site at www.hp.com/solutions.
In previous releases, client-specific authentication parameters for 802.1X Web, and MAC authentication are assigned to a port using different criteria. A RADIUS-assigned parameter is always given highest priority and overrides statically configured local passwords. 802.1X authentication parameters override Web or MAC authentication parameters.
Starting in release K.13.xx, DCA stores three levels of client-specific authentication parameters and prioritizes them according to the following hierarchy of precedence:
Client-specific configurations are applied on a per-parameter basis on a port. In a client-specific profile, if DCA detects that a parameter has configured values from two or more levels in the hierarchy of precedence described above, DCA decides which parameters to add or remove, or whether to fail the authentication attempt due to an inability to apply the parameters.
For example, NIM may configure only rate-limiting for a specified client session, while RADIUS-assigned values may include both an untagged VLAN ID and a rate-limiting value to be applied. In this case, DCA applies the NIM-configured rate-limiting value and the RADIUS-assigned VLAN (if there are no other conflicts).
Also, you can assign NIM-configured parameters (for example, VLAN ID assignment or rate-limiting) to be activated in a client session when a threat to network security is detected. When the NIM-configured parameters are later removed, the parameter values in the client session return to the RADIUS-configured or locally configured settings, depending on which are next in the hierarchy of precedence.
In addition, DCA supports conflict resolution for QoS (port-based CoS priority) and rate-limiting (ingress) by determining whether to configure either strict or non-strict resolution on a switch-wide basis. For example, if multiple clients authenticate on a port and a rate-limiting assignment by a newly authenticating client conflicts with the rate-limiting values assigned to previous clients, by using Network Immunity you can configure the switch to apply any of the following attributes:
For information about how to configure RADIUS-assigned and locally configured authentication settings, see:
-
RADIUS-assigned 802.1X authentication: Port-Based and User-Based Access Control (802.1X)
-
RADIUS-assigned Web or MAC authentication: Web-based and MAC authentication
-
RADIUS-assigned CoS, rate-limiting, and ACLS: RADIUS services supported on HP switches
-
Statically (local) configured: Configuring Username and Password Security
HP PMC IDM is a plug-in to HP PCM+ and uses RADIUS-based technologies to create a user-centric approach to network access management and network activity tracking and monitoring. IDM enables control of access security policy from a central management server, with policy enforcement to the network edge, and protection against both external and internal threats.
Using IDM, a system administrator can configure automatic and dynamic security to operate at the network edge when a user connects to the network. This operation enables the network to:
Criteria for enforcing RADIUS-based security for IDM applications includes classifiers such as:
Responses can be configured to support the networking requirements, user (SNMP) community, service needs, and access security level for a given client and device.
For more information on IDM, go to the HP Networking Web site at www.hp.com/solutions.
This section provides an overview of the switch’s access security features, authentication protocols, and methods. Access Security and Switch Authentication Features lists these features and provides summary configuration guidelines.
|
|
|
|
|
NOTE: Beginning with software release K.14.xx, the Management Interface wizard provides a convenient step-by-step method to prepare the switch for secure network operation. See Using the Management Interface wizard for details. |
|
|
Access Security and Switch Authentication Features
| Feature | Default setting | Security guidelines | More information and configuration details |
|---|---|---|---|
| Manager password | no password | Configuring a local Manager password is a fundamental step in reducing the possibility of unauthorized access through the switch's WebAgent and console (CLI and Menu) interfaces. The Manager password can easily be set by any one of the following methods:
|
Using the Management Interface wizard Using SNMP to view and configure switch authentication features |
| Telnet and Web-browser access (WebAgent) | enabled |
The default remote management protocols enabled on the switch are plain text protocols, which transfer passwords in open or plain text that is easily captured. To reduce the chances of unauthorized users capturing your passwords, secure and encrypted protocols such as SSH and SSL (see below for details) should be used for remote access. This enables you to employ increased access security while still retaining remote client access. Also, access security on the switch is incomplete without disabling Telnet and the standard Web browser access (WebAgent). Among the methods for blocking unauthorized access attempts using Telnet or the WebAgent are the following two CLI commands:
If you choose not to disable Telnet and the WebAgent, you may want to consider using RADIUS accounting to maintain a record of password-protected access to the switch. |
Using the Management Interface wizard
For more on Telnet and the WebAgent, see "Interface Access and System Information" in the Management and Configuration Guide. For RADIUS accounting, see RADIUS Authentication, Authorization, and Accounting |
| SSH | disabled | SSH provides Telnet-like functions through encrypted, authenticated transactions of the following types:
|
|
| SSL | disabled |
Secure Socket Layer (SSL) and Transport Layer Security (TLS) provide remote Web browser access (WebAgent) to the switch via authenticated transactions and encrypted paths between the switch and management station clients capable of SSL/TLS operation. The authenticated type includes server certificate authentication with user password authentication. |
|
| SNMP | public, unrestricted | In the default configuration, the switch is open to access by management stations running SNMP management applications capable of viewing and changing the settings and status data in the switch MIB (Management Information Base). Thus, controlling SNMP access to the switch and preventing unauthorized SNMP access should be a key element of your network security strategy. |
Using HP switch security features Using the Management Interface wizard Management and Configuration Guide, Chapter 14, see the section "Using SNMP Tools To Manage the Switch" |
| Authorized IP Managers | none |
This feature uses IP addresses and masks to determine whether to allow management access to the switch across the network through the following :
|
|
| Secure Management VLAN | disabled | This feature creates an isolated network for managing the HP switches that offer this feature. When a secure management VLAN is enabled, CLI, Menu interface, and WebAgent access is restricted to ports configured as members of the VLAN. | See "Static Virtual LANs (VLANs)" in the Advanced Traffic Management Guide for your switch |
| ACLs for Management Access Protection | none | ACLs can also be configured to protect management access by blocking inbound IP traffic that has the switch itself as the destination IP address. | |
| TACACS+ Authentication | disabled |
This application uses a central server to allow or deny access to TACACS-aware devices in your network. TACACS+ uses user name/password sets with associated privilege levels to grant or deny access through either the switch serial (console) port or remotely, with Telnet. If the switch fails to connect to a TACACS+ server for the necessary authentication service, it defaults to its own locally configured passwords for authentication control. TACACS+ allows both login (read-only) and enable (read/write) privilege level access. |
|
| RADIUS Authentication | disabled | For each authorized client, RADIUS can be used to authenticate operator or manager access privileges on the switch via the serial port (CLI and Menu interface), Telnet, SSH, and Secure FTP/Secure Copy (SFTP/SCP) access methods. | |
| 802.1X Access Control | none |
This feature provides port-based or user-based authentication through a RADIUS server to protect the switch from unauthorized access and to enable the use of RADIUS-based user profiles to control client access to network services. Included in the general features are the following:
|
|
| Web and MAC Authentication | none |
These options are designed for application on the edge of a network to provide port-based security measures for protecting private networks and the switch itself from unauthorized access. Because neither method requires clients to run any special supplicant software, both are suitable for legacy systems and temporary access situations where introducing supplicant software is not an attractive option. Both methods rely on using a RADIUS server for authentication. This simplifies access security management by allowing you to control access from a master database in a single server. It also means the same credentials can be used for authentication, regardless of which switch or switch port is the current access point into the LAN. Web authentication uses a webpage login to authenticate users for access to the network. MAC authentication grants access to a secure network by authenticating device MAC addresses for access to the network. |
|
|
|
|
|
NOTE: Beginning with software release K.14.xx, the Management Interface wizard provides a convenient step-by-step method to prepare the switch for secure network operation. See Using the Management Interface wizard for details. |
|
|
This section outlines features and defence mechanisms for protecting access through the switch to the network.
Network Security—Default Settings and Security Guidelines
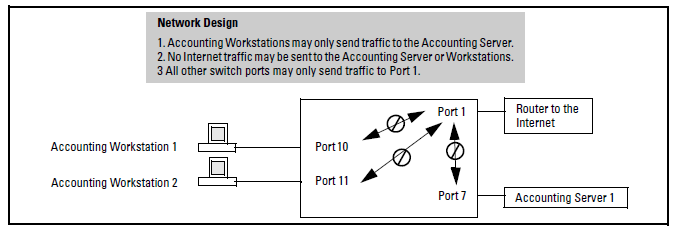
A company wants to manage traffic to the Internet and its accounting server on a 26-port switch. Their network is pictured in Network configuration for named source-port filters. Switch port 1 connects to a router that provides connectivity to a WAN and the Internet. Switch port 7 connects to the accounting server. Two workstations in accounting are connected to switch ports 10 and 11.
The switch includes in one filter the actions for all destination ports and trunks configured for a given source port or trunk. Thus, if a source-port filter already exists and you want to change the currently configured action for some destination ports or trunks, use the filter source-port command to update the existing filter. For example, suppose you configure a filter to drop traffic received on port 8 and destined for ports 1 and 2. The resulting filter is shown on the left in the following figure. Later, you update the filter to drop traffic received on port 8 and destined for ports 3 through 5. Since only one filter exists for a given source port, the filter on traffic from port 8 appears as shown on the right in the following figure:
This command displays a listing of all filters by index number and also enables you to use the index number to display the details of individual filters.
Syntax
corresponding filter index (IDX) numbers. IDX: An automatically assigned index number used to identify the filter for a detailed information listing. A filter retains its assigned IDX number for as long as the filter exists in the switch. The switch assigns the lowest available IDX number to a new filter. This can result in a newer filter having a lower IDX number than an older filter if a previous filter deletion created a gap in the filter listing.
Filter Type
Indicates the type of filter assigned to the IDX number (source-port, multicast, or protocol).
Value
Indicates the port number or port-trunk name of the source port or trunk assigned to the filte
[index]Lists the filter type and other data for the filter corresponding to the index number in the show filter output. Also lists, for each outbound destination port in the switch, the port number, port type, and filter action (forward or drop). The switch assigns the lowest available index number to a new filter. If you delete a filter, the index number for that filter becomes available for the next filter you create.