To configure the security settings using the CLI wizard, follow the steps below:
-
At the command prompt, type
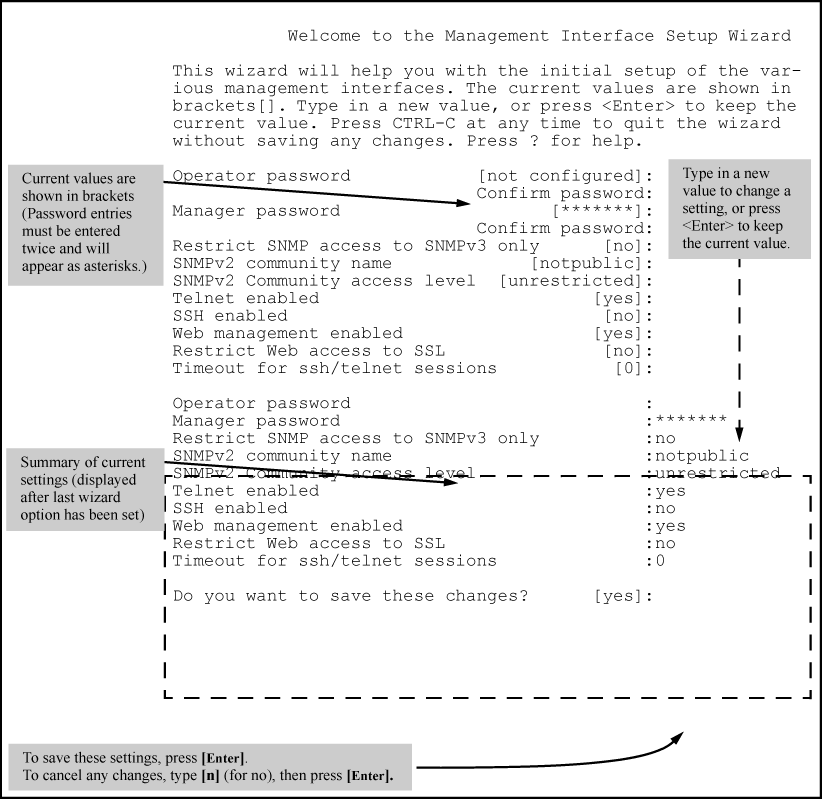
setup mgmt-interfaces.The welcome banner appears and the first setup option is displayed (
Operator password). As you advance through the wizard, each setup option displays the current value in brackets[ ]as shown in Management Interface wizard configuration. -
When you enter the wizard, you have the following options:
-
To update a setting, type in a new value, or press Enter to keep the current value.
-
To quit the wizard without saving any changes, press CTRL+C at any time.
-
To access online Help for any option, press ?.
After you have gone through each setup option, the wizard displays the summary configuration together with a prompt to save the changes, see Management Interface wizard configuration for an example.
-
-
When the message appears asking if you want to save these changes, you have the following options:
The named source-port filter command operates from the global configuration level.
Syntax
Defines or deletes a named source-port filter. The <filter-name> may contain a maximum of 20 alpha-numeric characters (longer names may be specified, but they are not displayed.) A filter-name cannot be a valid port or port trunk name. The maximum number of named source-port filters that can be used is equal to the number of ports on a switch. A named source-port filter can only be removed if it is not in use (use the
show filter source-portcommand to check the status). Named source-port filters are not automatically deleted when they are no longer used. Use the no option to delete an unused named source-port filter
Syntax
Configures the named source-port filter to drop traffic having a destination on the ports and port trunks in the <destination-port-list>. Can be followed by the
forwardoption if you have other destination ports or port trunks previously set to drop that you want to change toforward.For example:
filter source-port named-filter <filter-name>drop <destination- port-list> forward <destination-port-list>.The
destination-port-listmay contain ports, port trunks, and ranges (for example 3-7 or trk4-trk9) separated by commas.
Syntax
Configures the named source-port filter to forward traffic having a destination on the ports and port trunks in the
<destination-port-list>.Since “forward” is the default state for destinations in a filter, this command is useful when destinations in an existing filter are configured for “drop” and you want to change them to ”forward”.Can be followed by thedropoption if you have other destination ports set toforwardthat you want to change todrop.For example:
filter source-port named-filter <filter-name>forward <destination-port-list> drop <destination-port-list>
A named source-port filter must first be defined and configured before it can be applied. In the following example two named source-port filters are defined, web-onlyand accounting.
HP Switch(config)# filter source-port named-filter webonly
HP Switch(config)# filter source-port named-filter accounting
By default, these two named source-port filters forward traffic to all ports and port trunks.
To configure a named source-port filter to prevent inbound traffic from being forwarded to specific destination switch ports or port trunks, the dropoption is used. For example, on a 26-port switch, to configure the named source-port filter web-only to drop any traffic except that for destination ports 1 and 2, the following command would be used:
HP Switch(config)# filter source-port named-filter webonly drop 3-26
A named source-port filter can be defined and configured in a single command by adding the dropoption, followed by the required destination-port-list.
Example
While named source-port filters may be defined and configured in two steps, this is not necessary. Here we define and configure each of the named source-port filters for our example network in a single step.
Once the named source-port filters have been defined and configured we now apply them to the switch ports.

The show filter command shows what ports have filters applied.
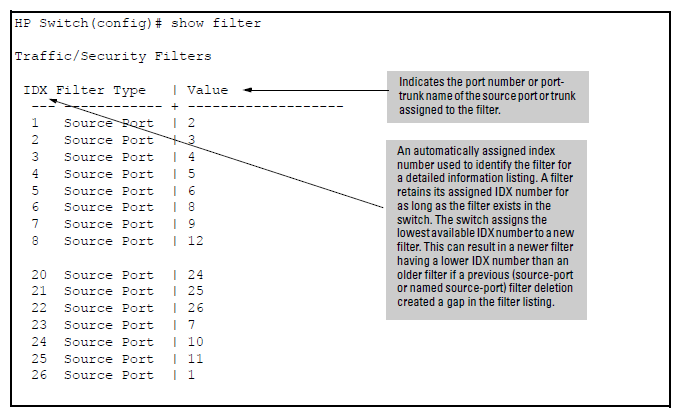
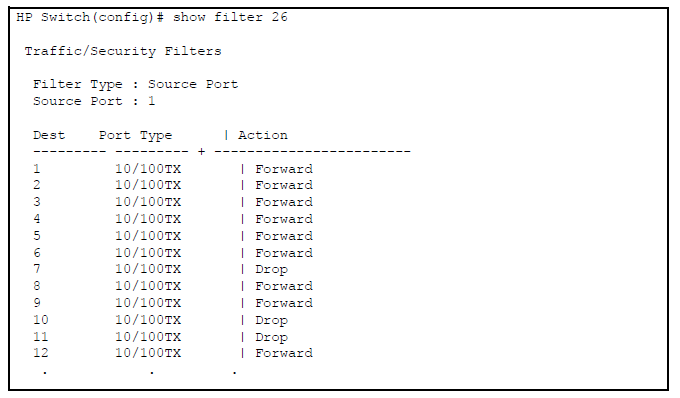
Using the IDX value in the show filter command, we can see how traffic is filtered on a specific port (Value).The two outputs below show a nonaccounting and an accounting switch port.

The same command, using IDX 26, shows how traffic from the Internet is handled.
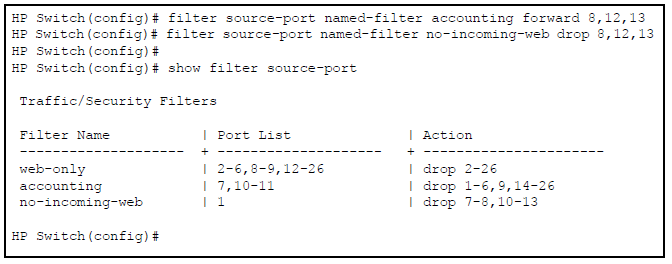
As the company grows, more resources are required in accounting. Two additional accounting workstations are added and attached to ports 12 and 13. A second server is added attached to port8.

The following revisions to the named source-port filter definitions maintain the desired network traffic management, as shown in the Action column of the show command.
We next apply the updated named source-port filters to the appropriate switch ports. As a port can only have one source-port filter (named or not named), before applying the new named source-port filters we first remove the existing source-port filters on the port.

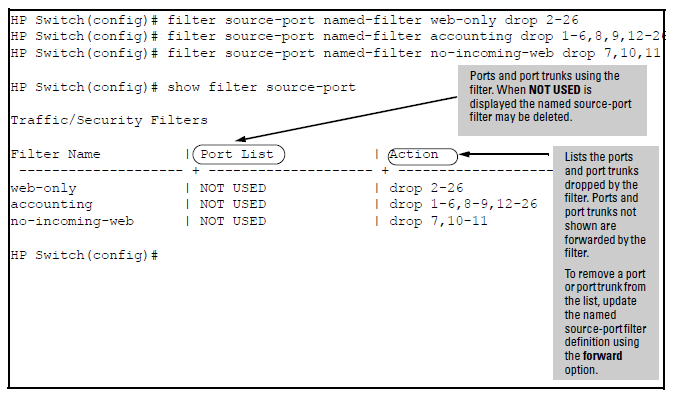
The named source-port filters now manage traffic on the switch ports as shown below, using the show filter source-port command.

Use this procedure to specify the type of filters to use on the switch and whether to forward or drop filtered packets for each filter you specify.
-
For inbound traffic matching the filter type, determine the filter action you want for each outbound (destination) port on the switch (forward or drop). The default action for a new filter is to forward traffic of the specified type to all outbound ports.
-
Use
show filterto check the filter listing to verify that you have configured correct action for the desired outbound ports.
Syntax
Specifies one inbound port or trunk. Traffic received inbound on this interface from other devices will be filtered. The no form of the command deletes the sourceport filter for <port-number> and returns the destination ports for that filter to the Forward action. (Default: Forward on all ports.)
NOTE: If multiple VLANs are configured, the source-port and the destination ports must be in the same VLAN unless routing is enabled. Similarly, if a VLAN containing both the source and destination is a multinet where either the source or destination port, or both, are on the same subnet.
![[NOTE: ]](images/note.gif)
Syntax
Configures the filter to drop traffic for the ports and trunks in the designated
<destination-port-list>. Can be followed byforward<destination-port-list>if you have other destination ports set todropthat you want to change toforward. If no drop or forward action is specified, the switch automatically creates a filter with aforwardaction from the designated source port (or trunk) to all destination ports (or trunks) on the switch.
Syntax
Configures the filter to forward traffic for the ports and/ or trunks in the designated
<destination-port-list>. Becauseforwardis the default state for destinations in a filter, this command is useful when destinations in an existing filter are configured fordropand you want to change them toforward. Can be followed bydrop<destination-port-list>if you have other destination ports set toforwardthat you want to change todrop. If no drop or forward action is specified, the switch automatically creates a filter with a forward action from the designated source port (or trunk) to all destination ports (or trunks) on the switch.
Example
For example, assume that you want to create a source-port filter that drops all traffic received on port 5 with a destination of port trunk 1 (Trk1) and any port in the range of port 10 to port 15. To create this filter you would execute this command:
HP Switch(config)# filter source-port 5 drop trk1,10-15
Later, suppose you wanted to shift the destination port range for this filter up by two ports; that is, to have the filter drop all traffic received on port 5 with a destination of any port in the range of port 12 to port 17. (The Trk1 destination is already configured in the filter and can remain as-is.)With one command you can restore forwarding to ports 10 and 11 while adding ports 16 and 17 to the "drop" list:
HP Switch(config)# filter source-port 5 forward 10-11 drop
16-17
This operation uses the same command as is used for configuring a filter on an individual port. However, the configuration process requires two steps:
For example, to create a filter on port trunk 1 to drop traffic received inbound for trunk 2 and ports 10-15:
HP Switch(config)# filter source-port trk1 drop trk2,10-15
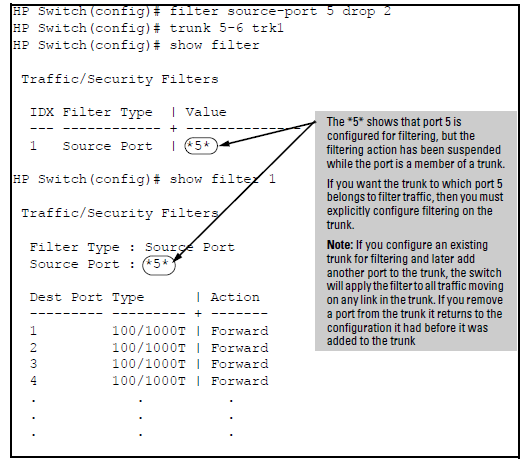
Note that if you first configure a filter on a port and then later add the port to a trunk, the port remains configured for filtering but the filtering action will be suspended while the port is a member of the trunk. That is, the trunk does not adopt filtering from the port configuration. You must still explicitly configure the filter on the port trunk. If you use the show filter <index> command for a filter created before the related source port was added to a trunk, the port number appears between asterisks ( * ), indicating that the filter action has been suspended for that filter. For example, if you create a filter on port 5, then create a trunk with ports 5 and 6, and display the results, you would see the following:
Syntax
Syntax
Specifies a protocol type. Traffic received (on any port) with this protocol type will be filtered. (Default: Forward on all ports.)
The
noform of the command deletes the protocol filter for the specified protocol and returns the destination ports for that filter to theForwardaction.
Example
Suppose you wanted to configure the filters in table 12-3 on a switch. (For more on source-port filters, see Configuring a source-port traffic filter.
Filter Example
| Filter Type | Filter Value | Action | Destination Ports |
|---|---|---|---|
| source-port | Inbound ports: A1, A2[a] | Drop | D1-D4 |
| multicast | 010000-123456 | Drop | C1-C24, D5-D10 |
| multicast | 010000-224466 | Drop | B1-B4 |
| protocol | Appletalk | Drop | C12-C18, D1 |
| protocol | ARP | Drop | D17, D21-D24 |
|
[a] *Because the switch allows one inbound port in a source-port filter, the requirement to filter ports A1 and A2 means you will configure two separate source-port filters. |
|||
