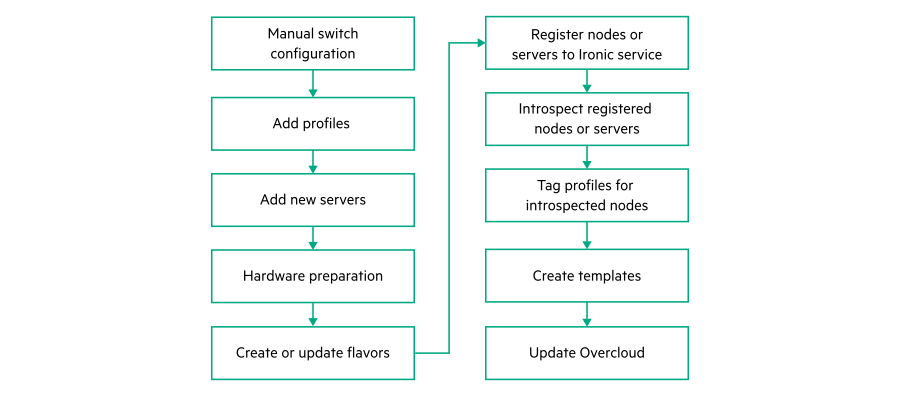
Adding and scaling up a HPE Synergy compute
The following image displays the processes in the VIM Overcloud adding and scaling a HPE Synergy compute and configuration:
Ensure to add the iLO ports of the new nodes in the management switch. For more information about the management switch configuration, see Manually configuring FlexFabric 5900 (Management) switch.
- Before adding a compute node to the VIM Overcloud, ensure that the VIM Overcloud is in the
OVERCLOUD_INSTALLEDstate by running the following command:nps show --data vim --node overcloud For the compute node expansion, the new nodes must be identical with the existing compute nodes. For example, same processors and same NICs in the same order.
-
Create a server profile. From the OneView main menu, select
Server Profiles, and then do one of the following:
Click + Create profile in the master pane.
- Select Actions > Create.NOTE:
The Actions menu is enabled only after a server profile is created.
From the Server Hardware screen, select the server hardware from the list of available servers (which displays the server properties), and click the Create profile link next to the server hardware name.NOTE:If the server hardware is not supported or is unmanaged, the Create profile link is not available.
NOTE:If you want to scale up with additional computes, select an existing server profile template to use.
- To create every server profile, repeat this procedure. Each profile is applied to one server; therefore, a profile for every server has to be created in the enclosures.
- Verify that the profile is created in the master pane.
- This server must be added in the cloud.
-
To add a new node, use the Addon Servers UI to generate the JSON file and run the following command with the location of the JSON file:
nps add-infra -f <location of the server profile JSON file>NOTE:The JSON file for adding nodes must be generated using the Addon Servers UI only. To create a JSON using the TICG, see Generating an input JSON using the TICG for Addon Kits.
- The following is a sample format of the JSON generated using the Addon servers UI:
{
    "topology_name": "<topology_name_same as starter kit>",
    "topology_modules": [
        <topology_modules_of_starter_kit>   ],
    "topology_data": {
        "infra": {
            "servers": [
                {
                    "description": "Description",
                    "hostname": ""<Name of the server>",
                    "hw_profile": "<Name of the server profile>",
                    "ilo": "<IP address of iLO>",
                    "user": ""<User name>",
                    "password": ""<password>",
                    "role": "<Role of the server>",
                    "model": "<Model of the server"
                }
            ],
            "oobm_type": "manual",
            "description": "<description>"
        }
    }
}
- To perform hardware preparation on the newly added compute nodes, see Hardware preparation.
-
To configure Mellanox SH2200 switch for HPE Synergy compute:
- MLAG Interface for Uplink and Host.
MLAG configuration is similar to port-channel configuration. It is recommended to keep the same port in each switch within the same MLAG-port-channel (not a must). In this example, there are two MLAG ports, one for each host (host s1 is connected to mlag-port-channel 10 on eth 1/9 and uplink eth1/1 is connected to mlag-port-channel 100).
NOTE:: The mlag-port-channel number is globally significant and must be the same on both switches.
- Configure the following on both switches for dpdk deployment:
sx01 (config) # interface mlag-port-channel 10 sx01 (config interface port-channel 10 ) # exit - To set the MLAG interface in LACP mode, run on both switches:
sx01 (config) # interface ethernet 1/9 mlag-channel-group 10 mode active - Enable interfaces on both switches:
sx01 (config) # interface mlag-port-channel 10 no shutdown To change any MLAG port parameter, for example, the MTU, simply enter to the MLAG interface configuration mode and perform the change.
NOTE:For some operations, use "force" or disable the link manually.
sx01 (config) # interface mlag-port-channel 10
sx01 (config interface mlag-port-channel 10 ) # mtu 9216 force
To change the LAG/MLAG port speed, all interfaces should be removed out of the LAG/MLAG while changing the speed in the member interface configuration mode. It is suggested to do so before adding the ports as members to the LAG/MLAG port as once the ports are members in a LAG/MLAG, there is no option to change the speed, without removing the port from the LAG/MLAG.
- Configure VLAN on both switches:
sx01 (config) # vlan 2050-2099Allowed vlan on the configured interface port:interface mlag-port-channel 10 switchport mode trunk interface mlag-port-channel 10 switchport trunk allowed-vlan add 2050-2099 interface mlag-port-channel 100 switchport mode trunk interface mlag-port-channel 100 switchport trunk allowed-vlan add 2050-2099 - Trunk configuration for HOST for SRIOV deployment:
interface ethernet 1/10 switchport mode trunk
interface ethernet 1/10 switchport trunk allowed-vlan add 2050-2099
- MLAG Interface for Uplink and Host.
-
To create or update flavors, run the following command:
nps deploy -s vim_overcloud -a update-flavors -
To check the status of the update-flavors operation, run the following command:
nps show --data vim --node overcloudWait until the status appears as
FLAVORS_UPDATEDorFLAVOR_UPDATE_FAILED.- If the state appears as
FLAVORS_UPDATED, log in to the Undercloud VM and verify that the flavors are created in the Undercloud by executing the following command:source stackrc openstack flavor list - If the state appears as
FLAVOR_UPDATE_FAILED, analyze thenps-rhosp-<topology_name>-ansible.logand thenps-rhosp-cli-<topology_name>-date.logfiles in the/var/nps/logs/<topology_name>/directory of the NPS toolkit VM. Based on the log files, complete the corrective actions. - To perform the update-flavors operation again, run the following command:
nps deploy -s vim_overcloud -a update-flavors
- If the state appears as
-
To register the nodes to the Ironic service, run the following command:
nps deploy -s vim_overcloud -a register-nodes -
To check the status of the register-nodes operation, run the following command:
nps show --data vim --node overcloudWait until the status appears as
NODES_REGISTERED,NODES_REGISTER_PARTIAL, orNODES_REGISTER_FAILED.- If the state appears as
NODES_REGISTERED, log in to the Undercloud VM and verify that the nodes are registered with the Ironic service by executing the following command:source stackrc openstack baremetal node list - If the state appears as
NODES_REGISTER_PARTIALorNODES_REGISTER_FAILED, analyze thenps-rhosp-<topology_name>-ansible.logand thenps-rhosp-cli-<topology_name>-date.logfiles in the/var/nps/logs/<topology_name>/directory of the NPS toolkit VM. Based on the log files, complete the corrective actions. - To perform the register-nodes operation again, run the following command:
nps deploy -s vim_overcloud -a register-nodes
- If the state appears as
-
To introspect the registered nodes, run the following command:
nps deploy -s vim_overcloud -a introspect-nodes -
To check the status of the introspect-nodes operation, run the following command:
nps show --data vim --node overcloudWait until the status appears as
NODES_INTROSPECTED,NODES_INTROSPECTED_PARTIAL, orNODES_INTROSPECTION_FAILED.- If the state appears as
NODES_INTROSPECTED, log in to the Undercloud VM and verify that the nodes are introspected by executing the following command:source stackrc openstack baremetal introspection list - If the state appears as
NODES_INTROSPECTED_PARTIALorNODES_INTROSPECTION_FAILED, analyze thenps-rhosp-<topology_name>-ansible.logand thenps-rhosp-cli-<topology_name>-date.logfiles in the/var/nps/logs/<topology_name>/directory of the NPS toolkit VM. Based on the log files, complete the corrective actions. - To perform the introspect-nodes operation again, see Rectifying node introspection failure in Node introspection fails with clean failed message.
- If the state appears as
-
To tag the nodes with the appropriate profiles, run the following command:
nps deploy -s vim_overcloud -a tag-nodes -
To check the status of the tag-nodes operation, run the following command:
nps show --data vim --node overcloudWait until the status appears as
PROFILES_UPDATED,PROFILES_UPDATED_PARTIAL, orPROFILES_UPDATE_FAILED.- If the state appears as
PROFILES_UPDATED, log in to the Undercloud VM and verify that the profiles are updated by executing the following command:source stackrc openstack overcloud profiles list - If the state appears as
PROFILES_UPDATED_PARTIALorPROFILES_UPDATE_FAILED, analyze thenps-rhosp-<topology_name>-ansible.logand thenps-rhosp-cli-<topology_name>-date.logfiles in the/var/nps/logs/<topology_name>/directory of the NPS toolkit VM. Based on the log files, complete the corrective actions. - To perform the tag-nodes operation again, run the following command:
nps deploy -s vim_overcloud -a tag-nodes
- If the state appears as
-
To create the Overcloud installation templates, run the following command:
nps deploy -s vim_overcloud -a create-templates -
To check the status of the create-templates operation, run the following command:
nps show --data vim --node overcloudWait until the status appears as
TEMPLATES_CREATEDorTEMPLATES_CREATION_FAILED.- If the state appears as
TEMPLATES_CREATED, log in to the Undercloud VM and verify that the templates are created by executing the following command:cd /home/stack/templatesVerify that the templates are available in the
/home/stack/templatesdirectory. - If the state appears as
TEMPLATES_CREATION_FAILED, analyze thenps-rhosp-<topology_name>-ansible.logand thenps-rhosp-cli-<topology_name>-date.logfiles in the/var/nps/logs/<topology_name>/directory of the NPS toolkit VM. Based on the log files, complete the corrective actions. - To perform the create-templates operation again, run the following command:
nps deploy -s vim_overcloud -a create-templates
- If the state appears as
-
To install the Overcloud, run the following command:
nps deploy -s vim_overcloud -a overcloud-install -
To check the status of the Overcloud-install operation, run the following command:
nps show --data vim --node overcloudWait until the status appears as
OVERCLOUD_INSTALLEDorOVERCLOUD_INSTALL_FAILED.- If the state appears as
OVERCLOUD_INSTALLED, from the Undercloud VM, record the administrator user name (OS_USERNAME) and the administrator password (OS_PASSWORD) from the/home/stack/overcloudrcfile. Record the URL of the dashboard from the/home/stack/overcloudrc/overcloud_install.logfile. - Open the Overcloud dashboard URL in a browser and log in using the administrator user name and password. Verify that all the services are running.
- If the state appears as
OVERCLOUD_INSTALL_FAILED, analyze the following log files:The
nps-rhosp-<topology_name>-ansible.logand thenps-rhosp-cli-<topology_name>-date.logfiles in the/var/nps/logs/<topology_name>/directory of the NPS toolkit VM.The
overcloud-install.logfile in the/home/stack/directory in the Undercloud VM.
Based on the log files, complete the corrective actions.
- To perform the Overcloud-install operation again, see Rectifying Undercloud uninstall failures.
- If the state appears as