HP Switch periodically provides switch software updates through the HP Switch Networking website. For more information, see the support and warranty booklet shipped with the switch, or visit http://www.hp.com/networking and click on software updates.
|
|
|
![[NOTE: ]](images/note.gif) |
NOTE: Downloading new switch software does not change the current switch configuration. The switch configuration is contained in separate files that can also be transferred. See Transferring switch configurations. In most cases, if a power failure or other cause interrupts a flash image download, the switch reboots with the image previously stored in primary flash. In the unlikely event that the primary image is corrupted (which may occur if a download is interrupted by a power failure), the switch goes into boot ROM mode. In this case, use the boot ROM console to download a new image to primary flash. |
|
|
-
A software version for the switch has been stored on a TFTP server accessible to the switch. (The software file is typically available from the HP Switch Networking website at http://www.hp.com/networking.)
-
The switch is properly connected to your network and has already been configured with a compatible IP address and subnet mask.
Before you use the procedure, do the following:
-
Obtain the IP address of the TFTP server in which the software file has been stored.
-
If VLANs are configured on the switch, determine the name of the VLAN in which the TFTP server is operating.
-
Determine the name of the software file stored in the TFTP server for the switch (For example, E0820.swi).
|
|
|
|
|
NOTE: If your TFTP server is a UNIX workstation, ensure that the case (upper or lower) that you specify for the filename is the same case as the characters in the software filenames on the server. |
|
|
Note that the menu interface accesses only the primary flash.
-
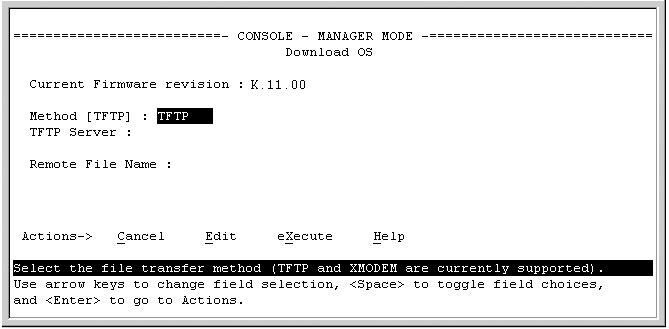
In the console Main Menu, select Download OS to display the screen in Example: of a download OS (software) screen (default values). (The term "OS" or "operating system" refers to the switch software):
-
In the TFTP Server field, enter the IP address of the TFTP server in which the software file has been stored.
-
In the Remote File Name field, enter the name of the software file (if you are using a UNIX system, remember that the filename is case-sensitive).
-
Press [Enter], then [X] (for eXecute) to begin the software download.
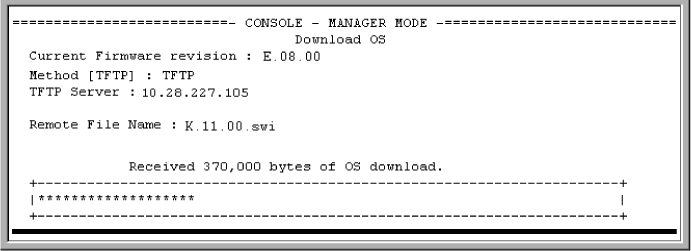
The screen shown in Example: of the download OS (software) screen during a download appears:
A "progress" bar indicates the progress of the download. When the entire software file has been received, all activity on the switch halts and you will see Validating and writing system software to FLASH...
-
After the primary flash memory is updated with the new software, you must reboot the switch to implement the newly downloaded software. Return to the Main Menu and press [6] (for Reboot Switch).
Continue reboot of system? : No
Press the space bar once to change No to Yes, then press [Enter] to begin the reboot.
NOTE: When you use the menu interface to download a switch software, the new image is always stored in primary flash. Also, using the
Reboot Switchcommand in the Main Menu always reboots the switch from primary flash. Rebooting the switch from the CLI provides more options. See "Rebooting the Switch" in the Basic Operation Guide for your switch.
-
After you reboot the switch, confirm that the software downloaded correctly:
For troubleshooting information on download failures, see Troubleshooting TFTP download failures.
When using the menu interface, if a TFTP download fails, the Download OS (Operating System, or software) screen indicates the failure (see Example: of message for download failure).
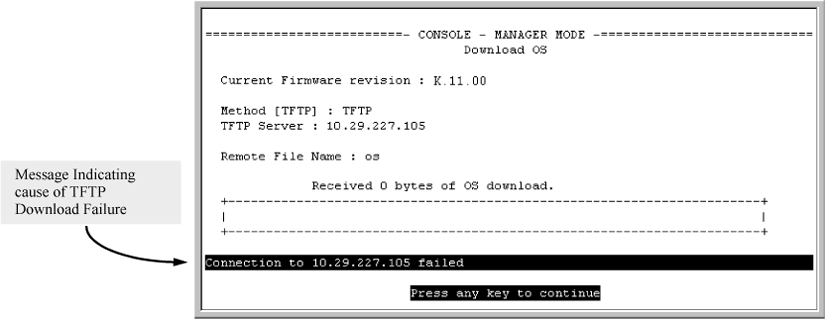
Some of the causes of download failures include:
-
Incorrect or unreachable address specified for the TFTP Server parameter. This may include network problems.
-
Incorrect name specified for the Remote File Name parameter, or the specified file cannot be found on the TFTP server. This can also occur if the TFTP server is a UNIX machine and the case (upper or lower) for the filename on the server does not match the case for the filename entered for the Remote File Name parameter in the Download OS (Operating System, or software) screen.
-
One or more of the switch's IP configuration parameters are incorrect.
-
For a UNIX TFTP server, the file permissions for the software file do not allow the file to be copied.
-
Another console session (through either a direct connection to a terminal device or through Telnet) was already running when you started the session in which the download was attempted.
To find more information on the cause of a download failure:
-
Examine the messages in the switch's Event Log by executing the
show log tftpcommand from the CLI. -
For descriptions of individual Event Log messages, see the latest version of the Event Log Message Reference Guide for your switch, available on the HP Switch website. (See "Getting Documentation From the Web".)
|
|
|
|
|
NOTE: If an error occurs in which normal switch operation cannot be restored, the switch automatically reboots itself, and an appropriate message is displayed after the reboot. |
|
|
Syntax:
Automatically downloads a switch software file to primary or secondary flash. If you do not specify the flash destination, the TFTP download defaults to primary flash.
Example:
To download a switch software file named k0800.swi from a TFTP server with the IP address of 10.28.227.103 to primary flash:
-
The command to download an OS (switch software)
HP Switch# copy tftp flash 10.28.227.103 k0800.swi
The primary OS Image will be deleted, continue [y/n]? y


01431K
When the switch finishes downloading the software file from the server, it displays this progress message:
-
When the download finishes, you must reboot the switch to implement the newly downloaded software image. To do so, use one of the following commands:
Syntax:
Boots from the selected flash.
Syntax:
Boots from the flash image and startup-config file. A switch covered in this guide (with multiple configuration files), also uses the current startup-config file.
For more information on these commands, see "Rebooting the Switch" in the Basic Operation Guide for your switch.
-
To confirm that the software downloaded correctly, execute
show systemand check the Firmware revision line.
For information on primary and secondary flash memory and the boot commands, see "Using Primary and Secondary Flash Image Options" in the Basic Operation Guide for your switch.
TFTP is enabled by default on the switch. If TFTP operation has been disabled, you can re-enable it by specifying TFTP client or server functionality with the tftp [client|server] command at the global configuration level.
Syntax:
The auto-tftp command lets you configure the switch to download software automatically from a TFTP server.
At switch startup, the auto-TFTP feature automatically downloads a specified software image to the switch from a specified TFTP server and then reboots the switch. To implement the process, you must first reboot the switch using one of the following methods:
Syntax:
By default, auto-TFTP is disabled. This command configures the switch to automatically download the specified software file from the TFTP server at the specified IP address. The file is downloaded into primary flash memory at switch startup; the switch then automatically reboots from primary flash.
|
|
|
|
|
NOTE: To enable auto-TFTP to copy a software image to primary flash memory, the version number of the downloaded software file (For example, XX_14_01.swi) must be different from the version number currently in the primary flash image. The current TFTP client status (enabled or disabled) does not affect auto-TFTP operation. (See Enabling TFTP (CLI).) Completion of the auto-TFTP process may require several minutes while the switch executes the TFTP transfer to primary flash and then reboots again. |
|
|
The no form of the command disables auto-TFTP operation by deleting the auto-tftp entry from the startup configuration.
The no auto-tftp command does not affect the current TFTP-enabled configuration on the switch. However, entering the ip ssh filetransfer command automatically disables both auto-tftp and tftp operation.
For some situations you may want to use a secure method to issue commands or copy files to the switch. By opening a secure, encrypted SSH session and enabling ip ssh file transfer, you can then use a third-party software application to take advantage of SCP and SFTP. SCP and SFTP provide a secure alternative to TFTP for transferring information that may be sensitive (like switch configuration files) to and from the switch. Essentially, you are creating a secure SSH tunnel as a way to transfer files with SFTP and SCP channels.
Once you have configured your switch to enable secure file transfers with SCP and SFTP, files can be copied to or from the switch in a secure (encrypted) environment and TFTP is no longer necessary.
To use these commands, you must install on the administrator workstation a third-party application software client that supports the SFTP and/or SCP functions. Some examples of software that supports SFTP and SCP are PuTTY, Open SSH, WinSCP, and SSH Secure Shell. Most of these are freeware and may be downloaded without cost or licensing from the internet. There are differences in the way these clients work, so be sure you also download the documentation.
As described earlier in this chapter you can use a TFTP client on the administrator workstation to update software images. This is a plain-text mechanism that connects to a standalone TFTP server or another HP switch acting as a TFTP server to obtain the software image files. Using SCP and SFTP allows you to maintain your switches with greater security. You can also roll out new software images with automated scripts that make it easier to upgrade multiple switches simultaneously and securely.
SFTP is unrelated to FTP, although there are some functional similarities. Once you set up an SFTP session through an SSH tunnel, some of the commands are the same as FTP commands. Certain commands are not allowed by the SFTP server on the switch, such as those that create files or folders. If you try to issue commands such as create or remove using SFTP, the switch server returns an error message.
You can use SFTP just as you would TFTP to transfer files to and from the switch, but with SFTP, your file transfers are encrypted and require authentication, so they are more secure than they would be using TFTP. SFTP works only with SSH version 2 (SSH v2).
|
|
|
|
|
NOTE: SFTP over SSH version 1 (SSH v1) is not supported. A request from either the client or the switch (or both) using SSH v1 generates an error message. The actual text of the error message differs, depending on the client software in use. Some examples are: |
|
|
SCP is an implementation of the BSD rcp (Berkeley UNIX remote copy) command tunneled through an SSH connection.
SCP is used to copy files to and from the switch when security is required. SCP works with both SSH v1 and SSH v2. Be aware that the most third-party software application clients that support SCP use SSHv1.
The general process for using SCP and SFTP involves three steps:
For more information about secure copy and SFTP, see Using SCP and SFTP.
-
Open an SSH session as you normally would to establish a secure encrypted tunnel between your computer and the switch.
For more detailed directions on how to open an SSH session, see chapter "Configuring secure shell (SSH)" in the Access Security Guide for your switch. Please note that this is a one-time procedure for new switches or connections. If you have already done it once you should not need to do it a second time.
-
To enable secure file transfer on the switch (once you have an SSH session established between the switch and your computer), open a terminal window and enter the following command:
HP Switch(config)# ip ssh filetransfer
For information on disabling TFTP and auto-TFTP, see Disabling TFTP and auto-TFTP for enhanced security.
Using the ip ssh filetransfer command to enable SFTP automatically disables TFTP and auto-TFTP (if either or both are enabled), as shown in Switch configuration with SFTP enabled.
Switch configuration with SFTP enabled
HP Switch(config)# ip ssh filetransfer Tftp and auto-tftp have been disabled.
If you enable SFTP and then later disable it, TFTP and auto-TFTP remain disabled unless they are explicitly re-enabled.
-
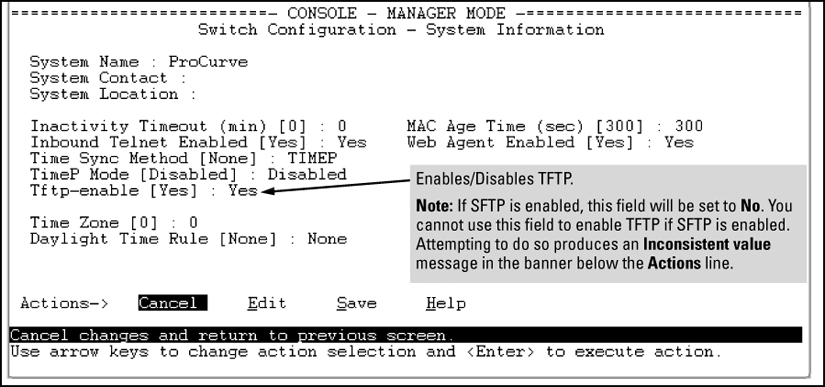
The TFTP feature is enabled by default, and can be enabled or disabled through the CLI, the Menu interface (see Using the Menu interface to disable TFTP), or an SNMP application. Auto-TFTP is disabled by default and must be configured through the CLI.
-
While SFTP is enabled, TFTP and auto-TFTP cannot be enabled from the CLI. Attempting to enable either non-secure TFTP option while SFTP is enabled produces one of the following messages in the CLI:
Similarly, while SFTP is enabled, TFTP cannot be enabled using an SNMP management application. Attempting to do so generates an "inconsistent value" message. (An SNMP management application cannot be used to enable or disable auto-TFTP.)
-
To enable SFTP by using an SNMP management application, you must first disable TFTP and, if configured, auto-TFTP on the switch. You can use either an SNMP application or the CLI to disable TFTP, but you must use the CLI to disable auto-TFTP. The following CLI commands disable TFTP and auto-TFTP on the switch.
|
|
|
|
|
NOTE: As a matter of policy, administrators should not enable the SSH V1-only or the SSH V1-or-V2 advertisement modes. SSHv1 is supported on only some legacy switches (such as the HP Switch Series 2500 switches). |
|
|
Once you have confirmed that you have enabled an SSH session (with the show ip ssh command), enter ip ssh filetransfer so that SCP and/or SFTP can run. You can then open your third-party software client application to begin using the SCP or SFTP commands to safely transfer files or issue commands to the switch.
Switch memory allows up to ten public keys. This means the authentication and encryption keys you use for your third-party client SCP/SFTP software can differ from the keys you use for the SSH session, even though both SCP and SFTP use a secure SSH tunnel.
Some clients, such as PSCP (PuTTY SCP), automatically compare switch host keys for you. Other clients require you to manually copy and paste keys to the $HOME/.ssh/known_hosts file. Whatever SCP/SFTP software tool you use, after installing the client software you must verify that the switch host keys are available to the client.
Because the third-party software utilities you may use for SCP/SFTP vary, you should refer to the documentation provided with the utility you select before performing this process.
-
Any attempts to use SCP or SFTP without using ip ssh filetransfer will cause the SCP or SFTP session to fail. Depending on the client software in use, you will receive an error message on the originating console, for Example:
-
There is a delay when SFTP is copying an image onto the switch, and although the command prompt returns in a couple of seconds, the switch may take approximately a minute and half writing the image to flash. You can keep entering the show flash command to see when the copy is complete and the flash is updated. You can also check the log for an entry similar to the following:
-
When an SFTP client connects, the switch provides a file system displaying all of its available files and folders. No file or directory creation is permitted by the user. Files may be only uploaded or downloaded, according to the permissions mask. All of the necessary files the switch needs are already in place on the switch. You do not need to (nor can you) create new files.
-
The switch supports one SFTP session or one SCP session at a time.
-
All files have read-write permission. Several SFTP commands, such as
createorremove, are not allowed and return an error message. The switch displays the following files:/ +---cfg | running-config | startup-config +---log | crash-data | crash-data-a | crash-data-b | crash-data-c | crash-data-d | crash-data-e " " | crash-data-f "" | crash-data-g | crash-data-h " " | crash-data-I "" | crash-data-J "" | crash-data-K "" | crash-data-L " " | crash-log | crash-log-a | crash-log-b | crash-log-c | crash-log-d | crash-log-e"" | crash-log-f"" | crash-log-g | crash-log-h" " | crash-log-I" " | crash-log-J" " | crash-log-K" " | crash-log-L" " | event log +---os | primary | secondary \---ssh +---mgr_keys | authorized_keys \---oper_keys | authorized_keys \---core | port_1-24.cor core-dump for ports 1-24 ( stackable switches only) | port_25-48.cor core-dump for ports 25-48 ( stackable switches only)
Once you have configured your switch for secure file transfers with SCP and SFTP, files can be copied to or from the switch in a secure (encrypted) environment and TFTP is no longer necessary.
You can verify secure file transfer operations by checking the switch's event log, or by viewing the error messages sent by the switch that most SCP and SFTP clients print out on their console.
|
|
|
|
|
NOTE: Messages that are sent by the switch to the client depend on the client software in use to display them on the user console. |
|
|
If an ssh connection is broken at the wrong moment (for instance, the link goes away or spanning tree brings down the link), a fatal exception occurs on the switch. If this happens, the switch gracefully exits the session and produces an Event Log message indicating the cause of failure. The following three examples show the error messages that may appear in the log, depending on the type of session that is running (SSH, SCP, or SFTP):
ssh: read error Bad file number, session aborted I 01/01/90
00:06:11 00636 ssh: sftp session from ::ffff:10.0.12.35 W
01/01/90 00:06:26 00641 ssh:

sftp read error Bad file number, session aborted I 01/01/90
00:09:54 00637 ssh: scp session from ::ffff:10.0.12.35 W 01/
01/90

ssh: scp read error Bad file number, session aborted
|
|
|
|
|
NOTE: The |
|
|
If you attempt to start an SCP (or SFTP) session while a flash write is in progress, the switch does not allow the SCP or SFTP session to start. Depending on the client software in use, the following error message may appear on the client console:
This next Example: shows the error message that may appear on the client console if a new SCP (or SFTP) session is started from a client before the previous client session has been closed (the switch requires approximately ten seconds to timeout the previous session):
-
The switch is connected via the Console RS-232 port to a PC operating as a terminal. (For information on connecting a PC as a terminal and running the switch console interface, see the Installation and Getting Started Guide you received with the switch.)
-
The terminal emulator you are using includes the Xmodem binary transfer feature. (For example, in the HyperTerminal application included with Windows NT, you would use the Send File option in the Transfer drop-down menu.)
|
|
|
|
|
NOTE: The menu interface accesses only the primary flash. |
|
|
-
Press [Enter], then [X] (for eXecute) to begin the software download.
The following message appears:
Press enter and then initiate Xmodem transfer from the attached computer.....
-
Press [Enter] and then execute the terminal emulator commands to begin Xmodem binary transfer.
For example, using HyperTerminal:
The download then commences. It can take several minutes, depending on the baud rate set in the switch and in your terminal emulator.
-
After the primary flash memory has been updated with the new software, you must reboot the switch to implement the newly downloaded software. Return to the Main Menu and press [6] (for Reboot Switch). You then see the following prompt:
Press the space bar once to change No to Yes, then press [Enter] to begin the reboot.
Syntax:
Downloads a software file to primary or secondary flash. If you do not specify the flash destination, the Xmodem download defaults to primary flash.
Example:
To download a switch software file named E0822.swi from a PC (running a terminal emulator program such as HyperTerminal) to primary flash:
-
Execute the terminal emulator commands to begin the Xmodem transfer. For example, using HyperTerminal:
-
When the download finishes, you must reboot the switch to implement the newly downloaded software. To do so, use one of the following commands:
Syntax:
Syntax:
For more information on these commands, see “Rebooting the Switches” in the Basic Operation Guide for your switch.
-
To confirm that the software downloaded correctly:
HP Switch> show system
Check the Firmware revision line. It should show the software version that you downloaded in the preceding steps.

If you need information on primary/secondary flash memory and the boot commands, see "Using Primary and Secondary Flash Image Options" in the Basic Operation Guide for your switch.
The switch's USB port (labeled as Auxiliary Port) allows the use of a USB flash drive for copying configuration files to and from the switch. Copy commands that used either tftp or xmodem now include an additional option for usb as a source or destination for file transfers.
Operating rules and restrictions on USB usage are:
-
Unformatted USB flash drives must first be formatted on a PC (Windows FAT format). For devices with multiple partitions, only the first partition is supported. Devices with secure partitions are not supported.
-
If they already exist on the device, subdirectories are supported. When specifying a <
filename>, you must enter either the individual file name (if at the root) or the full path name (For example, /subdir/filename). -
To view the contents of a USB flash drive, use the
dircommand. This lists all files and directories at the root. To view the contents of a directory, you must specify the subdirectory name (that is,dir <).subdirectory> -
The USB port supports connection to a single USB device. USB hubs to add more ports are not supported.
|
|
|
|
|
NOTE: Some USB flash drives may not be supported on your switch. Consult the latest Release Notes for information on supported devices. |
|
|
-
A software version for the switch has been stored on a USB flash drive. (The latest software file is typically available from the HP Switch Networking website at www.hp.com.)
-
Determine the name of the software file stored on the USB flash drive (For example,
k0800.swi). -
Decide whether the image will be installed in the primary or secondary flash. For more on primary/secondary flash memory and related boot commands, see "Using Primary and Secondary Flash Image Options" in the Basic Operation Guide for your switch.
Syntax:
This command automatically downloads a switch software file to primary or secondary flash. If you do not specify the flash destination, the USB download defaults to primary flash.
To copy a switch software file named k0800.swi from a USB device to primary flash:
-
When the switch finishes copying the software file from the USB device, it displays this progress message:
Validating and Writing System Software to the Filesystem....
-
When the copy finishes, you must reboot the switch to implement the newly loaded software. To do so, use one of the following commands
Syntax:
Syntax:
Boots from the flash image and startup-config file. A switch covered in this guide (with multiple configuration files), also uses the current startup-config file.
For more information on these commands, see "Rebooting the Switch" in the Basic Operation Guide for your switch.
-
To confirm that the software downloaded correctly, execute
show systemand check the Firmware revision line.
You can use TFTP to transfer a software image between two switches of the same series. The CLI enables all combinations of flash location options. The menu interface enables you to transfer primary-to-primary or secondary-to-primary.
Using the menu interface, you can download a switch software file from either the primary or secondary flash of one switch to the primary flash of another switch of the same series.
-
From the switch console Main Menu in the switch to receive the download, select 7. Download OS screen.
-
Ensure that the Method parameter is set to TFTP (the default).
-
In the TFTP Server field, enter the IP address of the remote switch containing the software file you want to download.
-
Press [Enter], and then [X] (for eXecute) to begin the software download.
A "progress" bar indicates the progress of the download. When the entire switch software download has been received, all activity on the switch halts and the following messages appear:
-
After the primary flash memory has been updated with the new software, you must reboot the switch to implement the newly downloaded software. Return to the Main Menu and press [6] (for Reboot Switch). You then see this prompt:
Press the space bar once to change
NotoYes, then press [Enter] to begin the reboot.
Where two switches in your network belong to the same series, you can download a software image between them by initiating a copy tftp command from the destination switch. The options for this CLI feature include:
Syntax:
When executed in the destination switch, downloads the software flash in the source switch's primary flash to either the primary or secondary flash in the destination switch.
If you do not specify either a primary or secondary flash location for the destination, the download automatically goes to primary flash.
To download a software file from primary flash in a switch with an IP address of 10.29.227.103 to the primary flash in the destination switch, you would execute the following command in the destination switch's CLI:
Syntax:
This command (executed in the destination switch) gives you the most options for downloading between switches. If you do not specify either a primary or secondary flash location for the destination, the download automatically goes to primary flash.
To download a software file from secondary flash in a switch with an IP address of 10.28.227.103 to the secondary flash in a destination switch, you would execute the following command in the destination switch's CLI: