KMS has three configuration steps:
This procedure is protocol-dependent. For information on a specific protocol, see the Management and Configuration Guide for your switch.
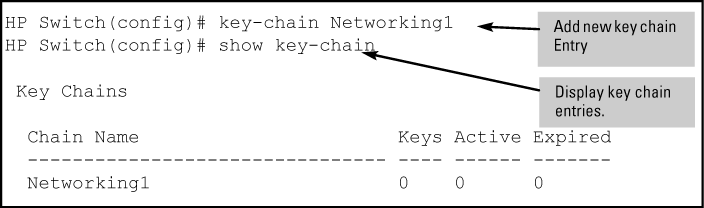
To use KMS, you must create one or more key chain entries. An entry can be the pointer to a single time-independent key or a chain of time-dependent keys.
|
|
|
![[NOTE: ]](images/note.gif) |
NOTE: The key chain information is copied to the standby management module (if redundancy is enabled and the standby module has passed self-test). |
|
|
Syntax:
Generate or delete a key chain entry. Using the optional
noform of the command deletes the key chain. The <> parameter can include up to 32 characters.chain_nameDisplays the current key chains on the switch and their overall status.
For example, to generate a new key chain entry:
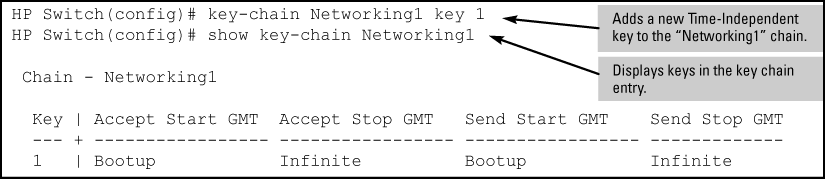
After adding an entry, assign keys to it for use by a KMS-enabled protocol.
A time-independent key has no Accept or Send time constraints. It is valid from boot-up until you change it. If you use a time-independent key, then it is the only key needed for a key chain entry.
Syntax:
Generates or deletes a key in the key chain entry <
>. Using the optionalchain_namenoform of the command deletes the key. The <> is any number from 0-255.key_idThis option lets you specify the key value for the protocol using the key. The <
> can be any string of up to 14 characters in length.key_str
accept-lifetime infinite:Allows packets with this key to be accepted at any time from boot-up until the key is removed.
send-lifetime infinite:Allows the switch to send this key as authorization, from boot-up until the key is removed.
Example:
To generate a new time-independent key for the HP switch key chain entry:
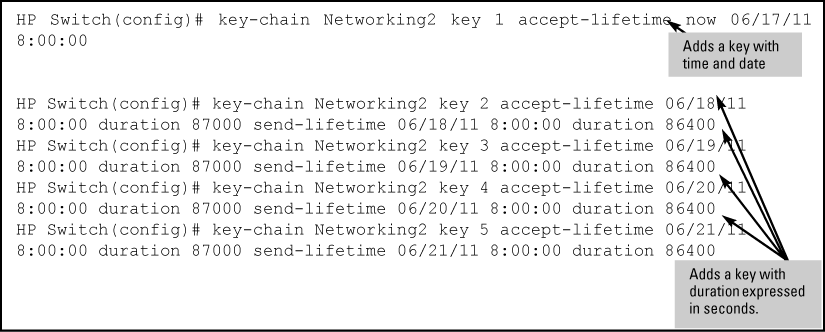
A time-dependent key has Accept or Send time constraints. It is valid only during the times that are defined for the key . If a time-dependent key is used, there is usually more than one key in the key chain entry.
Syntax:
Generates or deletes a key in the key chain entry
<. Using the optionalchain_name>noform of the command deletes the key. The<is any number from 0-255.key_id>This option specifies the key value referenced by the protocol using the key. The
<can be any string up to 14 characters in length.key_str>Specifies the start date and time of the valid period in which the switch can use this key to authenticate inbound packets.
Example:
|
|
|
|
|
NOTE: Given transmission delays and the variations in the time value from switch to switch, it is advisable to include some flexibility in the Accept lifetime of the keys you configure. Otherwise, the switch may disregard some packets because either their key has expired while in transport or there are significant time variations between switches. |
|
|
To list the result of the commands in Adding time-dependent keys to a key chain entry:
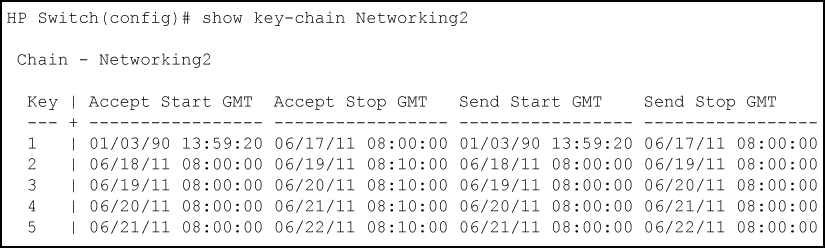
Use show key-chain to display the key status at the time the command is issued. Using the information from the example configuration in Adding time-dependent keys to a key chain entry and Display of time-dependent keys in the key chain entry if you execute show key-chain at 8:05 on 01/19/03, the display would appear as follows:
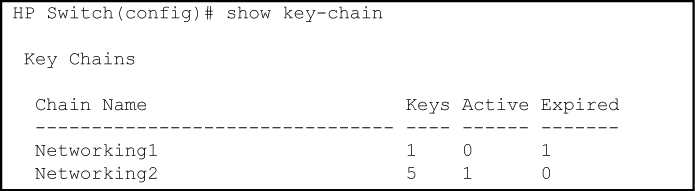
The "Networking1" key chain entry is a time-independent key and will not expire. "Networking2" uses time-dependent keys, which result in this data:
| Expired=1 | Key 1 has expired because its lifetime ended at 8:10 on 01/18/03, the previous day. |
| Active=2 | Key 2 and 3 are both active for 10 minutes from 8:00 to 8:10 on 1/19/03. |
Keys 4 and 5 are either not yet active or expired. The total number of keys is 5.