At a minimum, HP recommends that you always assign at least a manager password to the switch. Otherwise, under some circumstances, anyone with Telnet, web, or serial port access could modify the switch’s configuration.
You must generate a server certificate on the switch before enabling SSL. The switch uses this server certificate, along with a dynamically generated session key pair to negotiate an encryption method and session with a browser trying to connect via SSL to the switch. (The session key pair mentioned above is not visible on the switch. It is a temporary, internally generated pair used for a particular switch/client session, and then discarded.)
The server certificate is stored in the switch’s flash memory. The server certificate should be added to your certificate folder on the SSL clients who you want to have access to the switch. Most browser applications automatically add the switch’s host certificate to there certificate folder on the first use. This method does allow for a security breach on the first access to the switch. (See the documentation for your browser application.)
There are two types of certificated that can be used for the switch’s host certificate. The first type is a self-signed certificate, which is generated and digitally signed by the switch. Since self-signed certificates are not signed by a third-party certificate authority, there is no audit trail to a root CA certificate and no fool-proof means of verifying authenticity of certificate. The second type is a certificate authority-signed certificate, which is digitally signed by a certificate authority, has an audit trail to a root CA certificate, and can be verified unequivocally.
|
|
|
![[NOTE: ]](images/note.gif) |
NOTE: There is usually a fee associated with receiving a verified certificate and the valid dates are limited by the root certificate authority issuing the certificate. |
|
|
When you generate a certificate key pair and/or certificate on the switch, the switch places the key pair and/or certificate in flash memory (and not in running config.) Also, the switch maintains the certificate across reboots, including power cycles. You should consider this certificate to be “permanent”; that is, avoid regenerating the certificate without a compelling reason. Otherwise, you will have to reintroduce the switch’s host certificate on all management stations you have set up for SSL access to the switch using the earlier certificate.
Removing (zeroizing) the switch's certificate key pair or certificate render the switch unable to engage in SSL operation and automatically disables SSL on the switch. (To verify whether SSL is enabled, execute show config.)
Since the host certificate is stored in flash instead of the running-config file, it is not necessary to use write memory to save the certificate. Erasing the host certificate automatically disables SSL.
Generate a certificate key pair. This is done with the crypto key generate cert command. The default key size is 512.
|
|
|
|
|
NOTE: If a certificate key pair is already present in the switch, it is not necessary to generate a new key pair when generating a new certificate. The existing key pair may be reused and the |
|
|
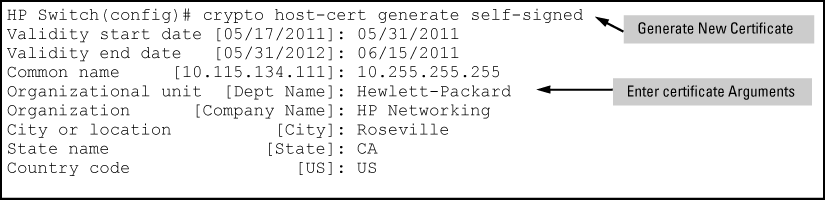
There are a number arguments used in the generation of a server certificate. Certificate field descriptions describes these arguments.
Certificate field descriptions
| Field Name | Description |
|---|---|
| Valid Start Date | This should be the date you desire to begin using the SSL functionality. |
| Valid End Date | This can be any future date, however good security practices would suggest a valid duration of about one year between updates of passwords and keys. |
| Common Name | This should be the IP address or domain name associated with the switch. Your web browser may warn you if this field does not match the URL entered into the web browser when accessing the switch |
| Organization | This is the name of the entity (e.g. company) where the switch is in service. |
| Organizational Unit | This is the name of the sub-entity (e.g. department) where the switch is in service. |
| City or Location | This is the name of the city where switch is in service |
| State Name | This is the name of the state or province where switch is in service |
| Country Code | This is the ISO two-letter country-code where switch is in service |
|
|
|
|
|
NOTE: “Zeroizing” the switch’s server host certificate or key automatically disables SSL (sets |
|
|
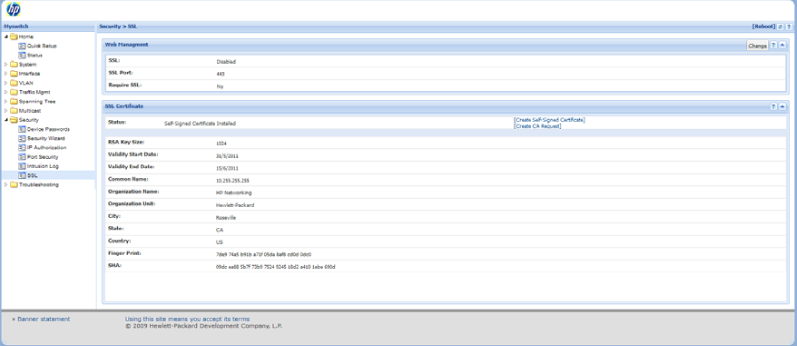
You can configure SSL from the WebAgent. For more information on how to access the WebAgent, see “Using the HP WebAgent” in the Management and Configuration Guide for your switch.
To generate a self signed host certificate from the WebAgent:
The installation of a CA-signed certificate involves interaction with other entities and consists of three phases. The first phase is the creation of the CA certificate request, which is then copied off from the switch for submission to the certificate authority. The second phase is the actual submission process that involves having the certificate authority verify the certificate request and then digitally signing the request to generate a certificate response (the usable server host certificate). The third phase is the download phase consisting of pasting to the switch web server the certificate response, which is then validated by the switch and put into use by enabling SSL.
To generate a certificate request from the WebAgent:
-
In the navigation pane, click on Security.
-
Click on SSL.
-
In the Web Management box, enable SSL if it is not already checked.
-
In the SSL Certificate box, fill out the fields and select Create request.
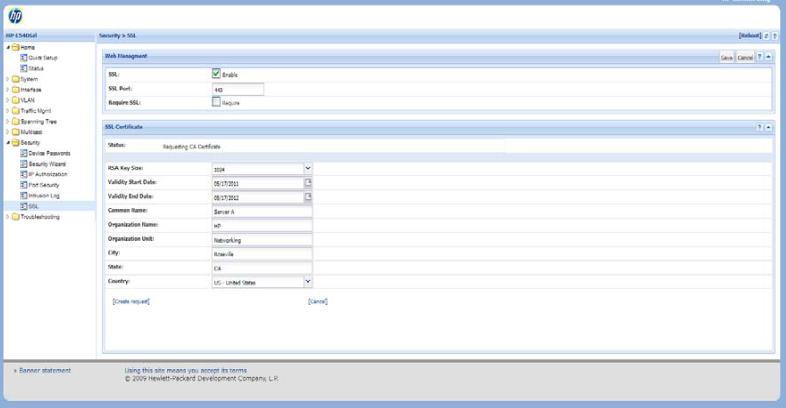
To access the online help for SSL certificate generation, click on “?” in the upper right corner of the screen.
The web-management ssl command enables SSL on the switch and modifies parameters the switch uses for transactions with clients. After you enable SSL, the switch can authenticate itself to SSL enabled browsers. If you want to disable SSL on the switch, use the no web-management ssl command.
|
|
|
|
|
NOTE: Before enabling SSL on the switch you must generate the switch’s host certificate and key. If you have not already done so, see Generating the switch's server host certificate. When configured for SSL, the switch uses its host certificate to authenticate itself to SSL clients, however unless you disable the standard HP WebAgent with the |
|
|
At the first contact between the switch and an SSL client, if you have not copied the switch’s host certificate into the browser’s certificate folder, your browser’s first connection to the switch will question the connection and, for security reasons, give you the option of accepting or refusing. If a CA-signed certificate is used on the switch, for which a root certificate exists on the client browser side, then the browser will NOT prompt the user to ensure the validity of the certificate. The browser will be able to verify the certificate chain of the switch server certificate up to the root certificate installed in the browser, thus authenticating the switch unequivocally. As long as you are confident that an unauthorized device is not using the switch’s IP address in an attempt to gain access to your data or network, you can accept the connection.
|
|
|
|
|
NOTE: When an SSL client connects to the switch for the first time, it is possible for a “man-in-the-middle” attack; that is, for an unauthorized device to pose undetected as the switch, and learn the usernames and passwords controlling access to the switch. When using self-signed certificates with the switch, there is a possibility for a “man-in-the-middle” attack when connecting for the first time; that is, an unauthorized device could pose undetected as a switch, and learn the usernames and passwords controlling access to the switch. Use caution when connecting for the first time to a switch using self-signed certificates. Before accepting the certificate, closely verify the contents of the certificate (see browser documentation for additional information on viewing contents of certificate.) The security concern described above does not exist when using CA-signed certificates that have been generated by certificate authorities that the web browser already trusts. |
|
|
-
Generate a Host certificate if you have not already done so. (See Generating the switch's server host certificate.)
|
|
|
|
|
NOTE: HP recommends using the default IP port number (443). However, you can use |
|
|
|
|
|
![[CAUTION: ]](images/caution.gif) |
CAUTION: SSL does not protect the switch from unauthorized access via the Telnet, SNMP, or the serial port. While Telnet access can be restricted by the use of passwords local to the switch, if you are unsure of the security this provides, you may want to disable Telnet access ( |
|
|