By default, a switch is enabled to send the SNMP notifications listed in Supported Notifications when a network security event (for example, authentication failure) occurs. However, before security notifications can be sent, you must first configure one or more trap receivers or SNMPv3 management stations as described in:
You can manage the default configuration of the switch to disable and re-enable notifications to be sent for the following types of security events:
You can send a specific SNMP trap for any configuration change made in the switch's running configuration file. The trap will be generated for changes made from any of these interfaces:
The SNMP trap contains the following information.
|
Information |
Description |
|---|---|
|
Event ID |
An assigned number that identifies a specific running configuration change event. |
|
Method |
Method by which the change was made—CLI, Menu, or remote SNMP. For configuration changes triggered by internal events, the term "Internal-Event" is used as the source of the change. |
|
IP Address Type |
Indicates the source address type of the network agent that made a change. This is set to an address type of "unknown" when not applicable. |
|
IP address |
IP address of the remote system from which a user accessed the switch. If not applicable, this is an empty string and nothing is displayed, for example, if access is through a management console port. |
|
User Name |
User name of the person who made the change. Null if not applicable. |
|
Date and Time |
Date and time the change was made. |
The SNMP trap alerts any interested parties that someone has changed the switch's configuration and provides information about the source for that change. It does not specify what has been changed.
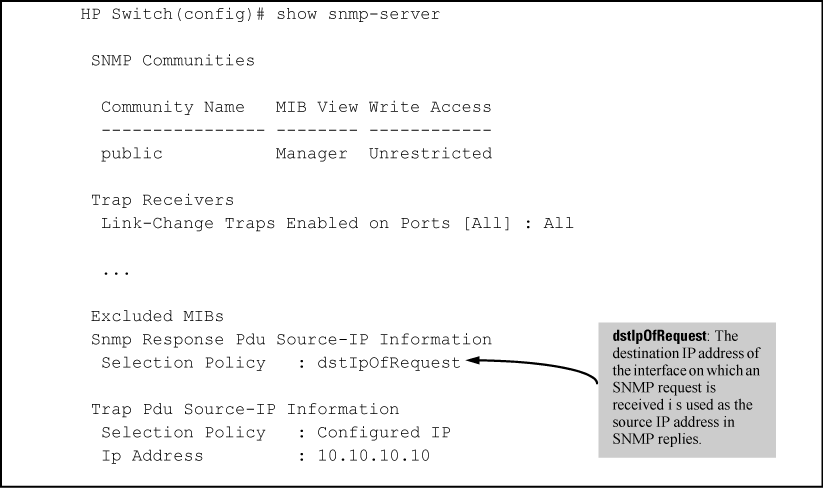
The switch uses an interface IP address as the source IP address in IP headers when sending SNMP notifications (traps and informs) or responses to SNMP requests.
For multi-netted interfaces, the source IP address is the IP address of the outbound interface of the SNMP reply, which may differ from the destination IP address in the IP header of the received request. For security reasons, it may be desirable to send an SNMP reply with the IP address of the destination interface (or a specified IP address) on which the corresponding SNMP request was received.
To configure the switch to use the source IP address on which an SNMP request was received in SNMP notification/traps and replies, enter the snmp-server response-source “Syntax” and snmp-server trap-source “Syntax???TITLE???” commands.
For switches that have a separate out-of-band management port, you can specify whether a configured SNMP server listens for SNMP queries over the OOBM interface, the data interface, or both. By default, the switch listens over both interfaces.
This option is not available for switches that do not have a separate OOBM port.
The listening mode is set with parameters to the snmp-server command.
The switch supports eight predefined group access levels, shown in Table 6-3. There are four levels for use by version 3 users and four are used for access by version 2c or version 1 management applications.
Predefined group access levels
|
Group name |
Group access type |
Group read view |
Group write view |
|---|---|---|---|
|
managerpriv |
Ver3 Must have Authentication and Privacy |
ManagerReadView |
ManagerWriteView |
|
managerauth |
Ver3 Must have Authentication |
ManagerReadView |
ManagerWriteView |
|
operatorauth |
Ver3 Must have Authentication |
OperatorReadView |
DiscoveryView |
|
operatornoauth |
Ver3 No Authentication |
OperatorReadView |
DiscoveryView |
|
commanagerrw |
Ver2c or Ver1 |
ManagerReadView |
ManagerWriteView |
|
commanagerr |
Ver2c or Ver1 |
ManagerReadView |
DiscoveryView |
|
comoperatorrw |
Ver2c or Ver1 |
OperatorReadView |
OperatorReadView |
|
comoperatorr |
Ver2c or Ver1 |
OperatorReadView |
DiscoveryView |
Each view allows you to view or modify a different set of MIBs:
|
|
|
![[NOTE: ]](images/note.gif) |
NOTE: All access groups and views are predefined on the switch. There is no method to modify or add groups or views to those that are predefined on the switch. |
|
|
SNMP commuities are supported by the switch to allow management applications that use version 2c or version 1 to access the switch. The communities are mapped to Group Access Levels that are used for version 2c or version 1 support. This mapping happens automatically based on the communities access privileges, but special mappings can be added with the snmpv3 community command.
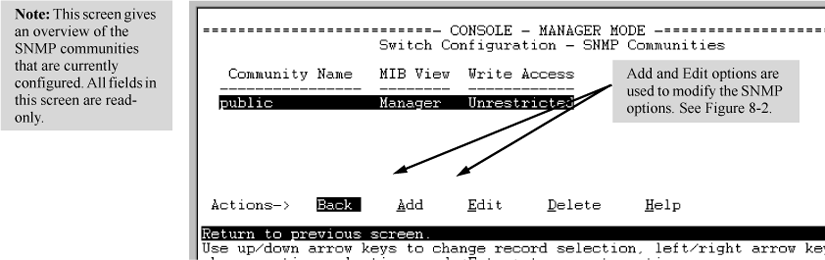
Use SNMP communities to restrict access to the switch by SNMP management stations by adding, editing, or deleting SNMP communities. You can configure up to five SNMP communities, each with either an operator-level or a manager-level view and either restricted or unrestricted write access.
Using SNMP requires that the switch have an IP address and subnet mask compatible with your network.
|
|
|
![[CAUTION: ]](images/caution.gif) |
CAUTION: For PCM/PCM+ version 1.5 or earlier (or any TopTools version), deleting the "public" community disables some network management functions (such as traffic monitoring, SNMP trap generation, and threshold setting.) If network management security is a concern, and if you are using the above software versions, HP recommends that you change the write access for the "public" community to "Restricted." |
|
|
On a switch enabled for SNMPv2c, you can use the snmp-server host inform command (Enabling SNMPv2c informs) to send inform requests when certain events occur. When an SNMP Manager receives an inform request, it can send an SNMP response back to the sending agent on the switch to let the agent know that the inform request reached its destination.
If the sending agent on the switch does not receive an SNMP response back from the SNMP Manager within the timeout period, the inform request may be resent, based on the retry count value.
When you enable SNMPv2c inform requests to be sent, you must specify the IP address and community name of the management station that will receive the inform notification.
This section describes how to configure a switch to send network security and link-change notifications to configured trap receivers.
By default, the following notifications are enabled on a switch:
-
Determine the versions of SNMP notifications that you want to use in your network.
-
To reconfigure any of the SNMP notifications that are enabled by default to be sent to a management station (trap receiver.)
-
(Optional) See the following sections to configure optional SNMP notification features and verify the current configuration:
The switches support the following functionality from earlier SNMP versions (SNMPv1 and SNMPv2c):
-
Trap receivers: A trap receiver is a management station to which the switch sends SNMP traps and (optionally) event log messages sent from the switch. From the CLI you can configure up to ten SNMP trap receivers to receive SNMP traps from the switch.
-
Fixed or "Well-Known" Traps: A switch automatically sends fixed traps (such as "coldStart", "warmStart", "linkDown", and "linkUp") to trap receivers using the
publiccommunity name. These traps cannot be redirected to other communities. If you change or delete the defaultpubliccommunity name, these traps are not sent. -
Thresholds: A switch automatically sends all messages created when a system threshold is reached to the network management station that configured the threshold, regardless of the trap receiver configuration.
Use the snmp-server host command to configure a trap receiver that can receive SNMPv1 and SNMPv2c traps, and (optionally) Event Log messages. When you configure a trap receiver, you specify its community membership, management station IP address, and (optionally) the type of Event Log messages to be sent.
If you specify a community name that does not exist—that is, has not yet been configured on the switch—the switch still accepts the trap receiver assignment. However, no traps are sent to that trap receiver until the community to which it belongs has been configured on the switch.
An SNMP trap is generated when a laptop/PC is removed from the back of an IP phone and the laptop/PC MAC address ages out of the MAC table for the HP Switch 2920 and HP 5400 series switch.
The mac-notify trap feature globally enables the generation of SNMP trap notifications on MAC address table changes (learns/moves/removes/ages.)
The following command enables trap for aged MAC addresses:
Syntax
Example
Use the following show command to display the different mac-notify traps configured on an interface:
SyntaxDisplays the following information:
Mac Notify Trap Information Mac-notify Enabled : No Mac-move Enabled : No Trap-interval : 30 Port MAC Addresses trap learned/removed/aged ------ --------------------------------------- 1 Learned, Removed & Aged 2 Removed & Aged 3 Learned & Aged 4 Learned & Removed 5 Aged 6 Learned 7 RemovedExampleFor port 1 the command would be as follows
Displays the following information:
1 Aged
SNMP traps generate while inserting or removing a powered up Power Supply Unit (PSU) without pulling out the power cable and also when removing a powered down PSU from the HP Switch 5406 Series. RMON log events are used to generate SNMP traps for PSU insertion and removal in both powered up and powered down states.
Log Event
Chassis: Power Supply 1 inserted
Chassis: Power Supply 1 removed while powered
Chassis: Power Supply 2 removed while not powered
Example
Power Supply inserted while powered off:
W 09/13/13 09:10:18 03834 chassis: AM1: Power Supply 1 inserted
W 09/13/13 09:10:19 00071 chassis: AM1: Power Supply failure: Supply: 1, Failures: 4
Example
Power Supply inserted while powered on:
W 09/13/13 09:06:20 03834 chassis: AM1: Power Supply 1 inserted
W 09/13/13 09:06:21 00071 chassis: AM1: Power Supply OK: Supply: 1, Failures: 2
Example
Power Supply removed while powered off:
W 09/13/13 09:08:57 03835 chassis: AM1: Power Supply 1 removed while not powered
W 09/13/13 09:08:57 00071 chassis: AM1: Power Supply failure: Supply: 1, Failures: 3
Example
Power Supply inserted while powered on:
W 09/13/13 09:03:36 03835 chassis: AM1: Power Supply 1 removed while powered
W 09/13/13 09:03:36 00071 chassis: AM1: Power Supply failure: Supply: 1, Failures: 2
|
|
|
|
|
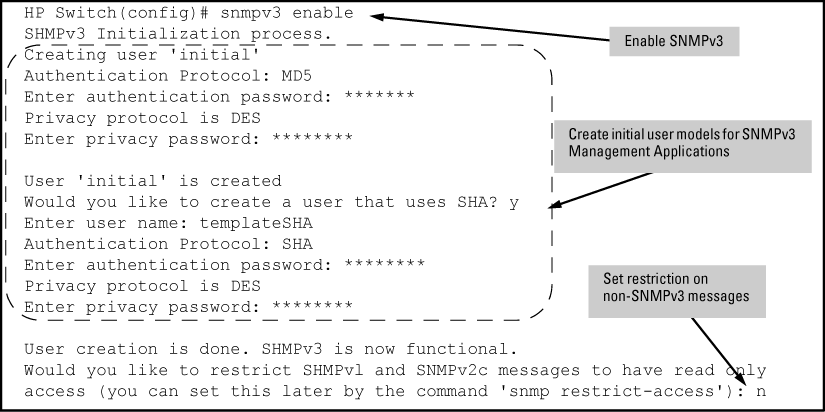
NOTE: To create new users, most SNMPv3 management software requires an initial user record to clone. The initial user record can be downgraded and provided with fewer features, but not upgraded by adding new features. For this reason, HP recommends that when you enable SNMPv3, you also create a second user with SHA authentication and DES privacy. |
|
|
To use SNMPv3 on the switch, you must configure the users that will be assigned to different groups:
|
|
|
|
|
CAUTION: If you add an SNMPv3 user without authentication, privacy, or both, to a group that requires either feature, the user will not be able to access the switch. Ensure that you add a user with the appropriate security level to an existing security group. |
|
|
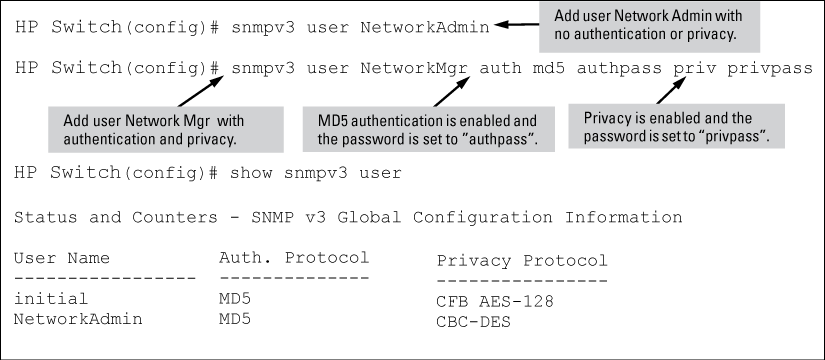
To configure an SNMPv3 user, you must first add the user name to the list of known users with the snmpv3 user command, as shown in Adding SNMPv3 users and displaying SNMPv3 configuration.
SNMP is a management protocol that allows an SNMP client application to retrieve device configuration and status information and to configure the device (get and set.) You can manage the switch via SNMP from a network management station running an application such as PCM+. For more information on PCM+, see the HP website at:
From the Products menu, select Network Management. The click on PCM+ Network Management under the HP Network Management bar.
To implement SNMP management, the switch must have an IP address configured either manually or dynamically (using DHCP or Bootp.) If multiple VLANs are configured, each VLAN interface should have its own IP address.
|
|
|
|
|
NOTE: If you use the switch's Authorized IP Managers and Management VLAN features, ensure that the SNMP management station, the choice of switch port used for SNMP access to the switch, or both, are compatible with the access controls enforced by these features. Otherwise, SNMP access to the switch will be blocked. |
|
|
SNMP management features on the switch include:
-
Security via configuration of SNMP communities (SNMPv3 communities)
-
Standard MIBs, such as the Bridge MIB (RFC 1493), Ethernet MAU MIB (RFC 1515), and others.
The switch SNMP agent also uses certain variables that are included in an HP proprietary MIB (management information base) file. If you are using HP OpenView, you can ensure that it is using the latest version of the MIB file by downloading the file to the OpenView database. To do so, go to the HP Networking website at:
SNMP access requires an IP address and subnet mask configured on the switch. If you are using DHCP/Bootp to configure the switch, ensure that the DHCP/Bootp process provides the IP address.
Once an IP address is configured, the main steps for configuring SNMPv1 and v2c access management features are:
-
Configure the appropriate SNMP communities. (See SNMPv3 communities.)
-
Configure the appropriate trap receivers. (See SNMP notifications.)
In some networks, authorized IP manager addresses are not used. In this case, all management stations using the correct community name may access the switch with the View and Access levels that have been set for that community. If you want to restrict access to one or more specific nodes, you can use the switch's IP Authorized Manager feature. (See the Access Security Guide.)
|
|
|
|
|
CAUTION: For PCM/PCM+ version 1.5 or earlier (or any TopTools version), deleting the "public" community disables some network management functions (such as traffic monitoring, SNMP trap generation, and threshold setting.) If network management security is a concern, and you are using the above software versions, HP recommends that you change the write access for the "public" community to "Restricted." |
|
|
SNMPv3 access requires an IP address and subnet mask configured on the switch. If you are using DHCP/Bootp to configure the switch, ensure that the DHCP/Bootp process provides the IP address.
Once you have configured an IP address, the main steps for configuring SNMPv3 access management features are the following:
In some networks, authorized IP manager addresses are not used. In this case, all management stations using the correct User and community name may access the switch with the View and Access levels that have been set for that community. If you want to restrict access to one or more specific nodes, you can use the IP Authorized Manager feature for the switch. (See the Access Security Guide.)
SNMP version 3 (SNMPv3) adds some new commands to the CLI for configuring SNMPv3 functions. To enable SNMMPv3 operation on the switch, use the snmpv3 enable command. An initial user entry will be generated with MD5 authentication and DES privacy.
You may (optionally) restrict access to only SNMPv3 agents by using the snmpv3 only command. To restrict write-access to only SNMPv3 agents, use the snmpv3 restricted-access command.
|
|
|
|
|
CAUTION: Restricting access to only version 3 messages will make the community named “public” inaccessible to network management applications (such as autodiscovery, traffic monitoring, SNMP trap generation, and threshold setting) from operating in the switch. |
|
|
The snmpv3 enable command allows the switch to:
-
Receive SNMPv3 messages.
-
Configure initial users.
-
Restrict non-version 3 messages to "read only" (optional.)
|
|
|
|
|
CAUTION: Restricting access to only version 3 messages makes the community named "public" inaccessible to network management applications (such as autodiscovery, traffic monitoring, SNMP trap generation, and threshold setting) from operating in the switch. |
|
|
Example
Syntax
[no] snmpv3 user <user_name>[auth md5|sha]auth_pass[ priv des | aes <priv_pass>
Adds or deletes a user entry for SNMPv3. Authorization and privacy are optional, but to use privacy, you must use authorization. When you delete a user, only the user_name is required.
With authorization, you can set either MD5 or SHA authentication. The authentication password auth_pass must be 6 to 32 characters and is mandatory when you configure authentication.
With privacy, the switch supports DES (56-bit) and AES (128-bit) encryption. The privacy password priv_pass must be 6 to 32 characters and is mandatory when you configure privacy.
|
|
|
|
|
NOTE: Only AES 128-bit and DES 56-bit encryption are supported as privacy protocols. Other non-standard encryption algorithms, such as AES-172, AES-256, and 3-DES are not supported. |
|
|
|
|
|
|
|
NOTE: For the 5400zl, 3800, and 8200zl switches, when the switch is in enhanced secure mode, commands that take a password as a parameter have the echo of the password typing replaced with asterisks. The input for the password is prompted for interactively. Additionally, the DES option is not available. For more information, see the Access Security Guide. |
|
|
Syntax
snmp-server host [ ipv4-addripv6-addr ] community name
Configures a destination network management station to receive SNMPv1/v2c traps and (optionally) Event Log messages sent as traps from the switch, using the specified community name and destination IPv4 or IPv6 address. You can specify up to ten trap receivers (network management stations.) (The default community name is public.)
|
[ |
Optional: Configures the security level of the Event Log messages you want to send as traps to a trap receiver.
|
|
[ |
Optional: Configures the switch to send SNMPv2 inform requests when certain events occur. |
Security levels for Event Log messages sent as traps
|
Security Level |
Action |
|---|---|
|
None (default) |
Sends no Event Log messages. |
|
All |
Sends all Event Log messages. |
|
Not-Info |
Sends all Event Log messages that are not for information only. |
|
Critical |
Sends only Event Log messages for critical error conditions. |
|
Debug |
Sends only Event Log messages needed to troubleshoot network- and switch-level problems. |
Example
To configure a trap receiver in a community named "red-team" with an IP address of 10.28.227.130 to receive only "critical" event log messages, you can enter the following command:
(HP_Switch_name#) snmp-server host 10.28.227.130 red-team critical
Syntax
[no] snmp-server host [ ipv4-addripv6-addr ]community name informretries ] [ counttimeout ]interval
Enables (or disables) the inform option for SNMPv2c on the switch and allows you to configure options for sending SNMP inform requests.
|
|
Maximum number of times to resend an (Default: 3) |
|
|
Number of seconds to wait for an acknowledgement before resending the (Default: 15 seconds) |
|
|
|
|
|
NOTE: The |
|
|
To verify the configuration of SNMPv2c informs, enter the show snmp-server command, as shown in Display of SNMPv2c inform configuration (note indication of inform Notify Type in bold below):
Display of SNMPv2c inform configuration
(HP_Switch_name#) show snmp-server

 SNMP Communities

  Community Name   MIB View Write Access
  ---------------- -------- ------------ public          Manager  Unrestricted

 Trap Receivers

  Link-Change Traps Enabled on Ports [All] : All
  ...
  Address               Community       Events Sent

Notify Type Retry Timeout
  --------------------- --------------- ----------- ----------- ----- --------
  15.28.333.456         guest           All

inform      3     15

 Excluded MIBs

 Snmp Response Pdu Source-IP Information

  Selection Policy   : Default rfc1517

 Trap Pdu Source-IP Information
  Selection Policy   : Configured IP
  Ip Address        : 10.10.10.10
The SNMPv3 notification process allows messages that are passed via SNMP between the switch and a network management station to be authenticated and encrypted.
-
Enable SNMPv3 operation on the switch by entering the
snmpv3 enablecommand. -
Configure SNMPv3 users by entering the
snmpv3 usercommand. Each SNMPv3 user configuration is entered in the User Table. -
Assign SNMPv3 users to security groups according to their level of access privilege by entering the
snmpv3 groupcommand. -
Define the name of an SNMPv3 notification configuration by entering the
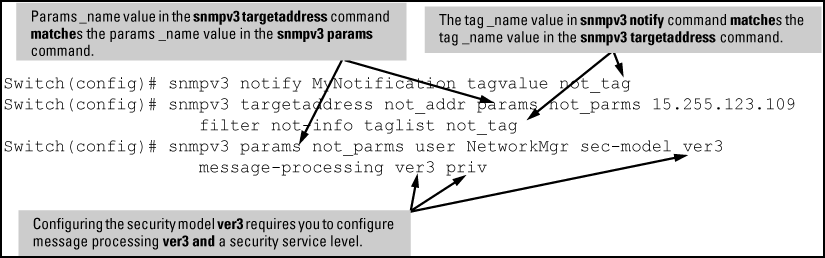
snmpv3 notifycommand.Syntax
[no]
snmpv3 notifynotify_nametagvaluetag_nameAssociates the name of an SNMPv3 notification configuration with a tag name used (internally) in SNMPv3 commands. To delete a notification-to-tag mapping, enter
no snmpv3 notify.notify_name -
Configure the target address of the SNMPv3 management station to which SNMPv3 informs and traps are sent by entering the
snmpv3 targetaddresscommand.Syntax
[no]
snmpv3 targetaddress[ipv4-addr|ipv6-addr]nameConfigures the IPv4 or IPv6 address, name, and configuration filename of the SNMPv3 management station to which notification messages are sent.
paramsparms_nameName of the SNMPv3 station's parameters file.
The parameters filename configured with
paramsmust match theparams_nameparamsvalue entered with theparams_namesnmpv3 paramscommand in Step 6.taglist[ tag_name ]tag_name…
Specifies the SNMPv3 notifications (identified by one or more
tag_namevalues) to be sent to the IP address of the SNMPv3 management station.You can enter more than one
tag_namevalue. Eachtag_namevalue must be already associated with the name of an SNMPv3 notification configuration entered with thesnmpv3 notifycommand in Step 4.Use a blank space to separate
tag_namevalues.You can enter up to 103 characters in
tag_nameentries following thetaglistkeyword.[
filter[none|debug|all|not-info|critical] ](Optional) Configures the type of messages sent to a management station.
(Default: none.)
[
udp-portport](Optional) Specifies the UDP port to use.
(Default: 162.)
[
port-maskmask](Optional) Specifies a range of UDP ports. (Default: 0.)
[
addr-maskmask](Optional) Specifies a range of IP addresses as destinations for notification messages.
(Default: 0.)
[
retriesvalue](Optional) Number of times a notification is retransmitted if no response is received. Range: 1-255.
(Default: 3.)
[
timeoutvalue](Optional) Time (in millisecond increments) allowed to receive a response from the target before notification packets are retransmitted. Range: 0-2147483647.
[Default: 1500 (15 seconds.)]
[
max-msg-sizesize](Optional) Maximum number of bytes supported in a notification message to the specified target. (Default: 1472)
-
Create a configuration record for the target address with the
snmpv3 paramscommand.
Syntax
[no] snmpv3 params params_name user user_name
Applies the configuration parameters and IP address of an SNMPv3 management station (from the params value configured with the params_namesnmpv3 targetaddress command in Step 5) to a specified SNMPv3 user (from the user value configured with the user_namesnmpv3 user command in Step 2.)
If you enter the snmpv3 params user command, you must also configure a security model ( sec-model) and message processing algorithm ( msg-processing.)
|
[ |
Configures the security model used for SNMPv3 notification messages sent to the management station configured with the If you configure the security model as |
|
[ |
Configures the algorithm used to process messages sent to the SNMPv3 target address. If you configure the message processing value as |
Example
An example of how to configure SNMPv3 notification is shown here:
SNMP communities are supported by the switch to allow management applications that use version 2c or version 1 to access the switch.
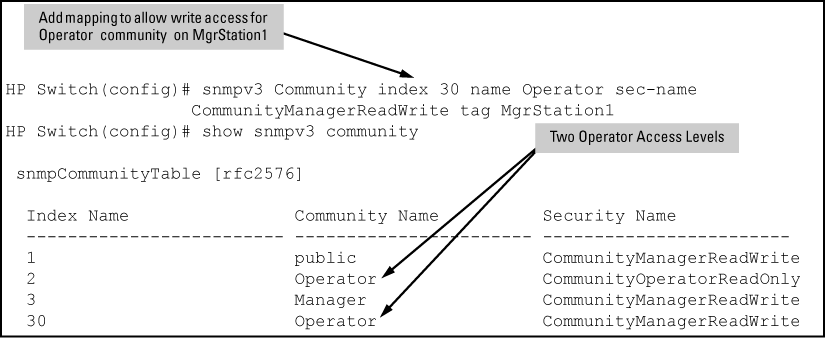
Syntax
[no] snmpv3 community
Maps or removes a mapping of a community name to a group access level. To remove a mapping you need to specify only the index_name parameter.
|
|
An index number or title for the mapping. The values of 1 to 5 are reserved and can not be mapped. |
|
|
The community name that is being mapped to a group access level. |
|
|
The group level to which the community is being mapped. |
|
|
This is used to specify which target address may have access by way of this index reference. |
Example
Assigning a community to a group access level shows the assigning of the Operator community on MgrStation1 to the CommunityOperatorReadWrite group. Any other Operator has an access level of CommunityOperatorReadOnly.
Syntax
Enables SNMP traps being sent when changes to the running configuration file are made.
transmission-interval controls the egress rate for generating SNMP traps for the running configuration file. The value configured specifies the time interval in seconds that is allowed between the transmission of two consecutive traps.0-2147483647
None of the running configuration change events that occur within the specified interval generate SNMP traps, although they are logged in the Configuration Changes History Table.
A value of 0 (zero) means there is no limit; traps can be sent for every running configuration change event.
You can send a specific SNMP trap for any configuration change made in the switch’s startup configuration file when the change is written to flash. Changes to the configuration file can occur when executing a CLI write command, executing an SNMP set command directly using SNMP, or when using the WebAgent
|
|
|
|
|
NOTE: A log message is always generated when a startup configuration change occurs. An example log entry is:
|
|
|
The corresponding trap message is sent if the snmp-server enable traps startupconfig- change command is configured.
Syntax
Enables notification of a change to the startup configuration. The change event is logged. Default: Disabled
An example of configuring the command from the CLI is shown in Figure 6-16. The number that displays when show config is executed is global for the switch and represents the startup configuration sequence number.
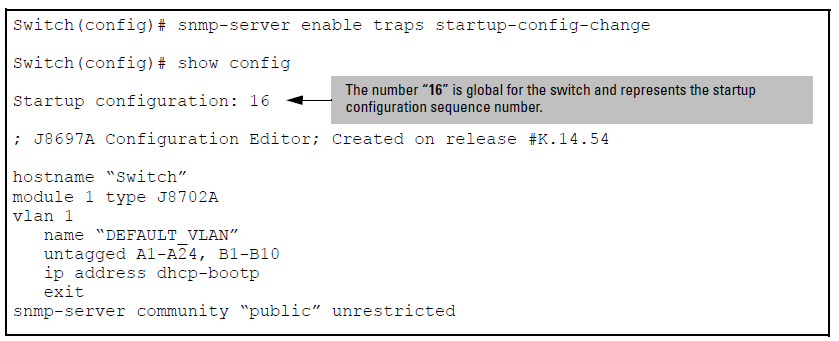
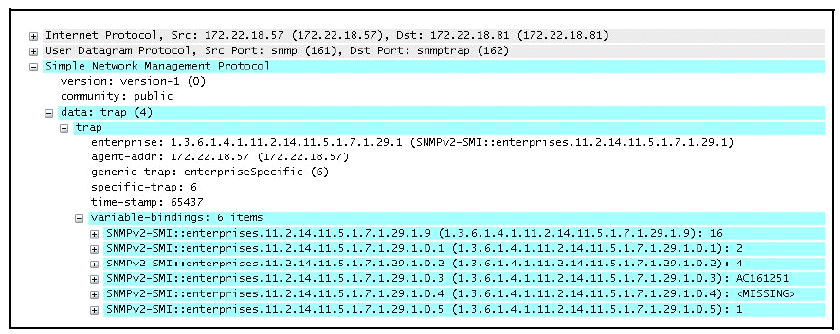
Figure 6-17 displays an example o f the fields in the trap when a change is made via SNMP (station ip=0xAC161251 (172.22.18.81), no username is set, and the new sequence number is 16.)
Syntax
[no] snmp-server response-source [ dst-ip-of-request [ ipv4-addr | ipv6-addr ] | loopback0-7 ]
Specifies the source IP address of the SNMP response PDU. The default SNMP response PDU uses the IP address of the active interface from which the SNMP response was sent as the source IP address.
The no form of the command resets the switch to the default behavior (compliant with rfc-1517.)
(Default: Interface IP address)
|
|
Destination IP address of the SNMP request PDU that is used as the source IP address in an SNMP response PDU. |
|
[ |
User-defined interface IP address that is used as the source IP address in an SNMP response PDU. Both IPv4 and IPv6 addresses are supported. |
|
|
IP address configured for the specified loopback interface that is used as the source IP address in an SNMP response PDU. If multiple loopback IP addresses are configured, the lowest alphanumeric address is used. |
Example
To use the IP address of the destination interface on which an SNMP request was received as the source IP address in the IP header of SNMP traps and replies, enter the following command:
(HP_Switch_name#) snmp-server response-source dst-ip-of-request
Syntax
[no] snmp-server trap-source [ ipv4-addr | loopback0-7 ]
Specifies the source IP address to be used for a trap PDU. To configure the switch to use a specified source IP address in generated trap PDUs, enter the snmp-server trap-source command.
The no form of the command resets the switch to the default behavior (compliant with rfc-1517.)
(Default: Use the interface IP address in generated trap PDUs)
|
|
User-defined interface IPv4 address that is used as the source IP address in generated traps. IPv6 addresses are not supported. |
|
|
P address configured for the specified loopback interface that is used as the source IP address in a generated trap PDU. If multiple loopback IP addresses are configured, the lowest alphanumeric address is used. |
|
|
|
|
|
NOTE: When you use the
|
|
|
To verify the configuration of the interface IP address used as the source IP address in IP headers for SNMP replies and traps sent from the switch, enter the show snmp-server command to display the SNMP policy configuration, as shown in Display of source IP address configuration.
Syntax
show snmp-server
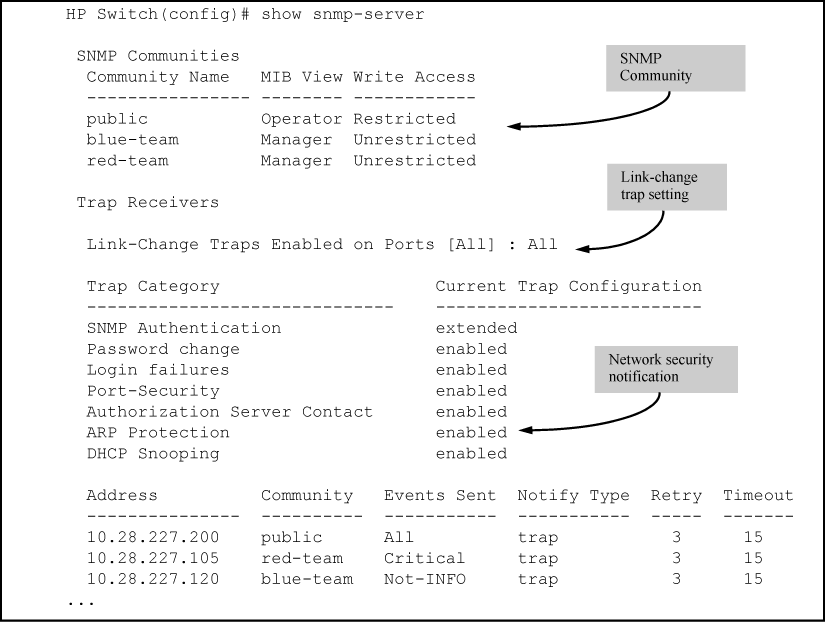
Displays the currently configured notification settings for versions SNMPv1 and SNMPv2c traps, including SNMP communities, trap receivers, link-change traps, and network security notifications.
Example
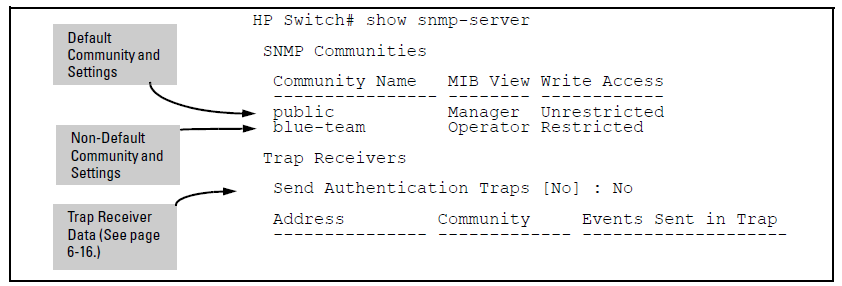
In the following example, the show snmp-server command output shows that the switch has been configured to send SNMP traps and notifications to management stations that belong to the "public," "red-team," and "blue-team" communities.
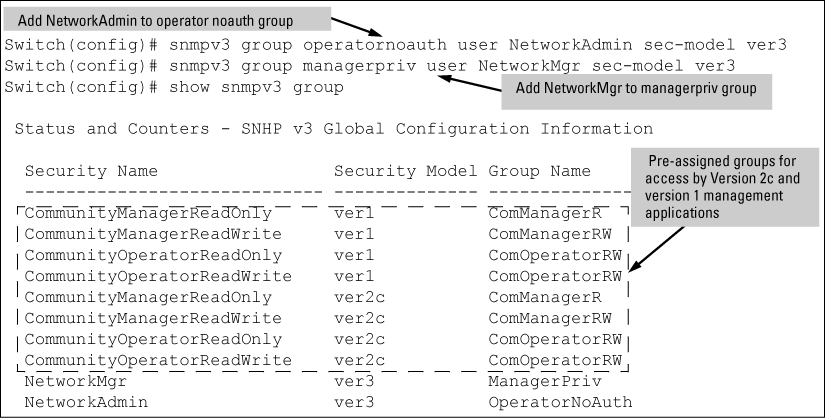
Next you must set the group access level for the user by assigning the user to a group. This is done with the snmpv3 group command, as shown in Assigning users to groups.
Syntax
[no] snmpv3 group
Assigns or removes a user to a security group for access rights to the switch. To delete an entry, all of the following three parameters must be included in the command:
|
|
Identifies the group that has the privileges that will be assigned to the user. |
|
|
Identifies the user to be added to the access group. This must match the user name added with the |
|
|
Defines which security model to use for the added user. An SNMPv3 access group should use only the ver3 security model. |
This command lists the data for currently configured SNMP community names along with trap receivers and the setting for authentication traps.
Syntax
show snmp-server [ community-string ]
Example
Lists the data for all communities in a switch; that is, both the default "public" community name and another community named "blue-team."
To list the data for only one community, such as the "public" community, use the above command with the community name included. For example:
HP Switch# show snmp-server public
The snmp-server command enables you to add SNMP communities with either default or specific access attributes, and to delete specific communities.
Syntax
[no] snmp-server community community-name
Configures a new community name.
The no form uses only the community-name
|
[ |
Optionally assigns an access level.
|
|
[ |
Optionally assigns MIB access type.
|
Example
To add the following communities:
|
Community |
Access Level |
Type of Access |
|---|---|---|
|
red-team |
manager (Access to all MIB objects.) |
unrestricted (read/write) |
|
blue-team |
operator (Access to all MIB objects except the CONFIG MIB.) |
restricted (read-only) |
(HP_Switch_name#) snmp-server community red-team
  manager unrestricted
(HP_Switch_name#) snmp-server community blue-team
  operator restricted
To eliminate a previously configured community named "gold-team":
HP Switch(config) # no snmp-server community gold-team
Syntax
[no]snmp-server enable traps [ snmp-auth | password-change-mgr | login-failure-mgr | port-security | auth-server-fail | dhcp-snooping | arp-protect | running-config-change | [macsec failure]]
Enables or disables sending one of the security notification types listed below to configured trap receivers. (Unless otherwise stated, all of the following notifications are enabled in the default configuration.)
The notification sends a trap:
|
|
If ARP packets are received with an invalid source or destination MAC address, an invalid IP address, or an invalid IP-to-MAC binding. |
|
|
If the connection with a RADIUS or TACACS+ authentication server fails. |
|
|
If DHCP packets are received from an untrusted source or if DHCP packets contain an invalid IP-to-MAC binding. |
|
|
If the switch is out of hardware resources needed to program a dynamic IP lockdown rule |
|
|
When the link state on a port changes from up to down, or the reverse. |
|
|
For a failed login with a manager password. |
|
|
When a manager password is reset. |
mac-notify |
Globally enables the generation of SNMP trap notifications upon MAC address table changes. |
|
|
For a failed authentication attempt through a web, MAC, or 801.X authentication session. |
|
|
When changes to the running configuration file are made. |
|
|
For a failed authentication attempt via SNMP. (Default: extended.) |
|
Sends a trap when changes to the startup configuration file are made.(Default: Disabled.) |
|
Set the trap for MACsec Connectivity Association (CA) failure. This trap is sent when establishing a MACsec CA fails or when a MACsec CA terminates due to MKA keep-alive timeout. |
To determine the specific cause of a security event, check the Event Log in the console interface to see why a trap was sent.
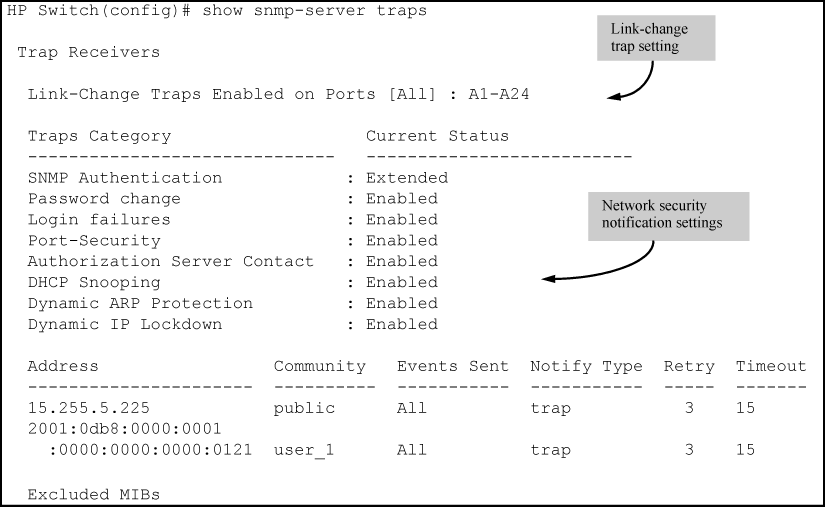
Show snmp-server traps
Trap Receivers
Link-Change Traps Enabled on Ports [All] : All

Traps Category                        Current Status
------------------       ----------------
SNMP Authentication                  : Extended
Password change                       : Enabled
Login failures                        : Enabled
Port-Security                          : Enabled
Authorization Server Contact   : Enabled
DHCP-Snooping                          : Enabled
Dynamic ARP Protection              : Enabled
Dynamic IP Lockdown                  : Enabled
Startup Config change               : Disabled
Running Config Change               : Disabled
MAC address table changes         : Disabled
MAC Address Count                     : Disabled
MACsec Failures               : Enabled

Address               Community             Events   Type    Retry   Timeout
---------- ----------------- -------- ------ ------- -------

Excluded MIBs
Snmp Response Pdu Source-IP Information
Selection Policy   : rfc1517
Trap Pdu Source-IP Information
Selection Policy   : rfc1517
Syntax
The command output is a subset of the information displayed with the show snmp-server command in Display of SNMP notification configuration.
By default, a switch is enabled to send a trap when the link state on a port changes from up to down (linkDown) or down to up (linkUp.) To reconfigure the switch to send link-change traps to configured trap receivers, enter the snmp-server enable traps link-change command.
Syntax
[no] snmp-server enable traps link-change [ <PORT-LIST>all ]
Enables or disables the switch to send a link-change trap to configured trap receivers when the link state on a port goes from up to down or down to up.
Enter all to enable or disable link-change traps on all ports on the switch.
For more information, See Configuring listening mode.
Syntax
snmp-server [ listen [ oobm | data | both ] ]
Enables or disables inbound SNMP access on a switch.
Use the no version of the command to disable inbound SNMP access.
The listen parameter is available only on switches that have a separate out-of-band management port. Values for this parameter are:
|
|
Inbound SNMP access is enabled only on the out-of-band management port. |
|
|
Inbound SNMP access is enabled only on the data ports. |
|
|
Inbound SNMP access is enabled on both the out-of-band management port and on the data ports. This is the default value. |
The listen parameter is not available on switches that do not have a separate out-of-band management port.