In the factory default configuration, the switch has no IP (Internet Protocol) address and subnet mask, and no passwords. In this state, it can be managed only through a direct console connection. To manage the switch through in-band (networked) access, you should configure the switch with an IP address and subnet mask compatible with your network. Also, you should configure a Manager password to control access privileges from the console and web browser interface. Other parameters in the Switch Setup screen can be left at their default settings or you can configure them with values you enter.
For more information on IP addressing, see Configuring IP Addressing.
![[NOTE: ]](images/note.gif)
The quickest and easiest way to minimally configure the switch for management and password protection is to use a direct console connection to the switch, start a console session, and access the Switch Setup screen.
-
Using the method described in the Installation and Getting Started Guide for your switch, connect a terminal device to the switch and display the switch console command (CLI) prompt (the default display).
The CLI prompt appears displaying the switch model number, for example:
HP E8200zl#
-
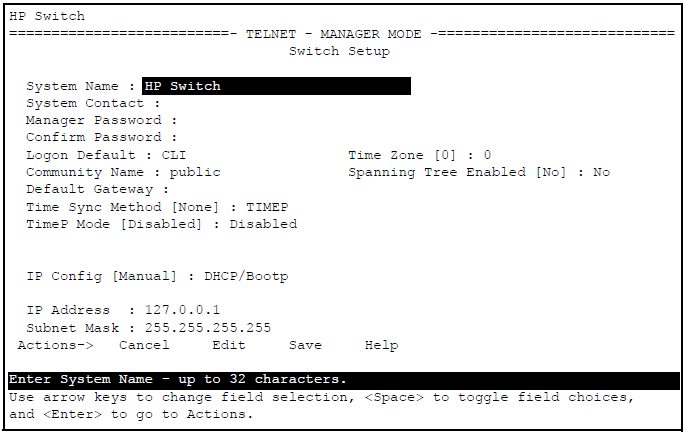
Screen. The following illustration is an example of a Setup screen with default settings. Your screen may vary slightly.
-
Use the [Tab] key to select the Manager Password field and enter a manager password of up to 16 characters and press [Tab].
-
Tab to the IP Config (DHCP/Bootp) field and use the Space bar to select the Manual option and press [Tab].
-
Tab to the IP Address field and enter the IP address that is compatible with your network and press Enter.
-
Tab to the Subnet Mask field and enter the subnet mask used for your network.
Setup screen field descriptions
| Parameter | Default | Description |
|---|---|---|
| System Name | blank | Optional; up to 255 characters, including spaces |
| System Contact | blank | Optional; up to 255 characters, including spaces |
| Manager Password | blank | Recommended; up to 16 characters (no blank spaces) |
| Logon Default | CLI | The default setting selects the command line interface for console access. The alternative is the Menu interface. |
| Time Zone | 0 (none) | Optional: 1440 to -1440. The number of minutes your location is to the West (-) or East (+) of GMT. |
| Community Name | public | Default setting recommended. |
| Spanning Tree Enabled | No | Default setting recommended unless STP is already running on your network or the switch will be used in complex network topologies. |
| Default Gateway | blank | Recommended. Enter the IP address of the next-hop gateway node if network traffic needs to be able to reach off-subnet destinations. |
| Time Sync Method | TimeP | Optional: The protocol the switch uses to acquire a time signal. The options are SNTP and TimeP. |
| TimeP Mode | Disabled |
Synchronizes the time kept on the switch to the TimeP server.[a] |
| IP Config | DHCP/Bootp | Set to Manual unless a DHCP/Bootp server is used on your network to configure IP addressing. |
| IP Address | xxx.xxx.xxx.xxx |
Recommended. If you set IP Config to Manual, then enter an IP address compatible with your network.[b] |
| Subnet Mask | xxx.xxx.xxx.xxx |
Recommended. If you entered an IP address, then enter a subnet mask compatible with your network.[b] |
|
[a] For more on this topic, see the "Time Protocols" chapter in the latest Management and Configuration Guide for your switch. [b] The IP address and subnet mask assigned for the switch must be compatible with the IP addressing used in your network. For more on IPv4 addressing, see Configuring IP Addressing. For IPv6 addressing topics, see the latest IPv6 Configuration Guide for your switch. |
||