If the switch either fails to show a link between an installed transceiver and another device or demonstrates errors or other unexpected behavior on the link, check the port configuration on both devices for a speed and/or duplex (mode) mismatch.
-
To check the mode setting for a port on the switch, use either the Port Status screen in the menu interface or
show interfaces briefin the CLI (see Viewing port status and configuration (CLI)). -
To display information about the transceivers installed on a switch, enter the
show tech receiverscommand in the CLI (The show tech transceivers command).
Status and parameters for each port type
The menu interface displays the configuration for ports and (if configured) any trunk groups.
4. Port Status
A switch port status screen
==========================- CONSOLE - MANAGER MODE -==========================
                       Status and Counters - Port Status

                  Intrusion                           MDI   Flow  Bcast
  Port     Type     Alert   Enabled Status     Mode   Mode  Ctrl  Limit
  ----- --------- --------- ------- ------ ---------- ----- ----- ------
  1     100/1000T No        Yes     Down   100FDx     Auto  off   0
  2     100/1000T No        Yes     Down   1000FDx    Auto  off   0
  3     100/1000T No        Yes     Down   1000FDx    Auto  off   0
  4     100/1000T No        Yes     Down   1000FDx    Auto  off   0
  5     100/1000T No        Yes     Down   1000FDx    Auto  off   0
  6     100/1000T No        Yes     Down   1000FDx    Auto  off   0
  7     100/1000T No        Yes     Down   1000FDx    Auto  off   0
  8     100/1000T No        Yes     Down   1000FDx    Auto  off   0
  9     100/1000T No        Yes     Down   1000FDx    Auto  off   0
  10    100/1000T No        Yes     Down   1000FDx    Auto  off   0
  11    100/1000T No        Yes     Down   1000FDx    Auto  off   0

 Actions->   Back   Intrusion log   Help

Return to previous screen.
Use up/down arrow keys to scroll to other entries, left/right arrow keys to
change action selection, and <Enter> to execute action.
The menu interface uses the same screen for configuring both individual ports and port trunk groups. For information on port trunk groups, see the chapter on "Port Trunking".
-
Port/trunk settings with a trunk group configured
=====================- TELNET - MANAGER MODE -===================== Switch Configuration - Port/Trunk Settings Port Type Enabled Mode Flow Ctrl Group Type ---- -------- + -------- ----------- --------- ----- ----- A1 1000T | Yes Auto-10-100 Disable A2 1000T | Yes Auto-10-100 Disable A3 1000T | Yes Auto Disable A3 1000T | Yes Auto Disable A4 1000T | Yes Auto Disable A5 1000T | Yes Auto Disable A6 1000T | Yes Auto Disable A7 1000T | Yes Auto Disable Trk1 Trunk A8 1000T | Yes Auto Disable Trk2 Trunk Actions-> Cancel Edit Save Help Cancel changes and return to previous screen. Use arrow keys to change action selection and <Enter> to execute action. -
The cursor moves to the
EnabledFor further information on configuration options for these features, see the online help provided with this screen.
-
When you have finished making changes to the above parameters, press
[Enter],then press[S](forSave).
Use the following commands to display port status and configuration data.
Syntax:
Lists the current operating status for all ports on the switch.
Lists a subset of configuration data for all ports on the switch; that is, for each port, the display shows whether the port is enabled, the operating mode, and whether it is configured for flow control.
Shows a summary of network traffic handled by the specified ports.
The show interfaces brief command listing
HP Switch(config)# show interfaces brief
Status and Counters - Port Status

                | Intrusion                            MDI   Flow  Bcast
Port  Type      | Alert     Enabled Status Mode        Mode  Ctrl  Limit
----- --------- + --------- ------- ------ ----------  ----- ----- ------
B1    100/1000T | No        Yes     Down   Auto-10-100 Auto  off   0
B2    100/1000T | No        Yes     Down   1000FDx     Auto  off   0
B3    100/1000T | No        Yes     Down   1000FDx     Auto  off   0
B4    100/1000T | No        Yes     Down   1000FDx     Auto  off   0
B5    100/1000T | No        Yes     Down   1000FDx     Auto  off   0
B6    100/1000T | No        Yes     Down   1000FDx     Auto  off   0
The show interfaces config command listing
HP Switch(config)# show interfaces config

 Port Settings


  Port  Type      | Enabled Mode         Flow Ctrl MDI
  ----- --------- + ------- ------------ --------- ----
  B1    100/1000T | Yes     Auto-10-100  Disable   Auto
  B2    100/1000T | Yes     Auto         Disable   Auto
  B3    100/1000T | Yes     Auto         Disable   Auto
  B4    100/1000T | Yes     Auto         Disable   Auto
  B5    100/1000T | Yes     Auto         Disable   Auto
  B6    100/1000T | Yes     Auto         Disable   Auto
Syntax:
Uses the
displayoption to initiate the dynamic update of theshow interfacescommand, with the output being the same as theshow interfacescommand.
|
|
|
![[NOTE: ]](images/note.gif) |
NOTE: Select Back to exit the display. |
|
|
Example:
HP Switch# show interfaces display
When using the display option in the CLI, the information stays on the screen and is updated every 3 seconds, as occurs with the display using the menu feature. The update is terminated with Cntl-C.
You can use the arrow keys to scroll through the screen when the output does not fit in one screen.
You can create show commands displaying the information that you want to see in any order you want by using the custom option.
Syntax:
Select the information that you want to display. Supported columns are shown in Supported columns, what they display, and examples:.
Supported columns, what they display, and examples:
|
Parameter column |
Displays |
Examples |
|---|---|---|
|
port |
Port identifier |
A2 |
|
type |
Port type |
100/1000T |
|
status |
Port status |
up or down |
|
speed |
Connection speed and duplex |
1000FDX |
|
mode |
Configured mode |
auto, auto-100, 100FDX |
|
mdi |
MDI mode |
auto, MDIX |
|
flow |
Flow control |
on or off |
|
name |
Friendly port name |
|
|
vlanid |
The vlan id this port belongs to, or "tagged" if it belongs to more than one vlan |
4 tagged |
|
enabled |
port is or is not enabled |
yes or no intrusion |
|
intrusion |
Intrusion alert status |
no |
|
bcast |
Broadcast limit |
0 |
The custom show interfaces command
HP Switch(config)# show int custom 1-4 port name:4 type vlan intrusion speed enabled mdi

 Status and Counters - Custom Port Status

                                   Intrusion
  Port Name       Type       VLAN  Alert     Speed   Enabled MDI-mode
  ---- ---------- ---------- ----- --------- ------- ------- --------
  1    Acco       100/1000T  1     No        1000FDx Yes     Auto
  2    Huma       100/1000T  1     No        1000FDx Yes     Auto
  3    Deve       100/1000T  1     No        1000FDx Yes     Auto
  4    Lab1       100/1000T  1     No        1000FDx Yes     Auto
You can specify the column width by entering a colon after the column name, then indicating the number of characters to display. In The custom show interfaces command, the Name column displays only the first four characters of the name. All remaining characters are truncated.
|
|
|
|
|
NOTE: Each field has a fixed minimum width to be displayed. If you specify a field width smaller than the minimum width, the information is displayed at the minimum width. For example, if the minimum width for the Name field is 4 characters and you specify Name:2, the Name field displays 4 characters. |
|
|
You can enter parameters in any order. There is a limit of 80 characters per line; if you exceed this limit an error displays.
For information on error messages associated with this command and for notes about pattern matching with this command, see Error messages associated with the show interfaces command.
|
Error |
Error message |
|---|---|
|
Requesting too many fields (total characters exceeds 80) |
Total length of selected data exceeds one line |
|
Field name is misspelled |
Invalid input: < |
|
Mistake in specifying the port list |
Module not present for port or invalid port: < |
|
The port list is not specified |
Incomplete input: custom |
If you have included a pattern matching command to search for a field in the output of the show int custom command, and the show int custom command produces an error, the error message may not be visible and the output is empty. For example, if you enter a command that produces an error (such as vlan is misspelled) with the pattern matching include option, the output may be empty:
It is advisable to try the show int custom command first to ensure there is output, and then enter the command again with the pattern matching option.
Note that in the above command, you can substitute int for interface; that is: show int custom.
Use the show interface port-utilization command to view a real-time rate display for all ports on the switch. A show interface port-utilization command listing shows a sample output from this command.
A show interface port-utilization command listing
HP Switch(config)# show interfaces port-utilization
 Status and Counters - Port Utilization

                             Rx                            Tx
 Port  Mode     | -------------------------- | --------------------------
                | Kbits/sec  Pkts/sec  Util  | Kbits/sec  Pkts/sec  Util
 ----- -------- + ---------- --------- ----- + ---------- --------- -----
 B1    1000FDx  | 0          0         0     | 0          0         0
 B2    1000FDx  | 0          0         0     | 0          0         0
 B3    1000FDx  | 0          0         0     | 0          0         0
 B4    1000FDx  | 0          0         0     | 0          0         0
 B5    1000FDx  | 0          0         0     | 0          0         0
 B6    1000FDx  | 0          0         0     | 0          0         0
 B7     100FDx  | 624        86        00.62 | 496        0         00.49
-
For each port on the switch, the command provides a real-time display of the rate at which data is received (Rx) and transmitted (Tx) in terms of kilobits per second (KBits/s), number of packets per second (Pkts/s), and utilization (Util) expressed as a percentage of the total bandwidth available.
-
The
show interfaces <command can be used to display the current link status and the port rate average over a 5 minute period. Port rates are shown in bits per second (bps) for ports up to 1 Gigabit; for 10 Gigabit ports, port rates are shown in kilobits per second (Kbps).port-list>
The show interfaces transceivers command allows you to:
The show tech transceivers command shows sample output from the show tech transceivers command.
|
|
|
|
|
NOTE: Part # column in The show tech transceivers command enables you to determine the manufacturer for a specified transceiver and revision number. |
|
|
The show tech transceivers command
HP Switch# show tech transceivers

Transceiver Technical Information:
 Port # |   Type    | Prod # | Serial #         | Part #
 -------+-----------+--------+------------------+----------
 21     | 1000SX    | J4858B | CN605MP23K       |
 22     | 1000LX    | J4859C | H11E7X           | 2157-2345
 23     | ??        | ??     | non operational  |
 25     | 10GbE-CX4 | J8440A | US509RU079       |
 26     | 10GbE-CX4 | J8440A | US540RU002       |
 27     | 10GbE-LR  | J8437B | PPA02-2904:0017  | 2157-2345
 28     | 10GbE-SR  | J8436B | 01591602         | 2158-1000
 29     | 10GbE-ER  | J8438A | PPA03-2905:0001  |

The following transceivers may not function correctly:
 Port #         Message
 --------       ------------------------
 Port 23        Self test failure.
-
The following information is displayed for each installed transceiver:
-
For a non-HP switches installed transceiver (see line 23 The show tech transceivers command), no transceiver type, product number, or part information is displayed. In the Serial Number field,
non-operationalis displayed instead of a serial number. -
The following error messages may be displayed for a non-operational transceiver:
-
Unsupported Transceiver. (SelfTest Err#060)
Check:
www.hp.com/rnd/device_help/2_inform for more info.
-
This switch only supports revision B and above transceivers.
Check:
www.hp.com/rnd/device_help/2_inform for more info.
-
Self test failure.
-
Transceiver type not supported in this port.
-
Transceiver type not supported in this software version.
-
Not an HP Switch Transceiver.
Go to:
www.hp.com/rnd/device_help/2_inform for more info.
-
You can configure one or more of the following port parameters.
See Status and parameters for each port type.
Syntax:
Disables or enables the port for network traffic. Does not use the
noform of the command. (Default:enable.)
Note that in the above Syntax:, you can substitute
intforinterface(for example,int <).port-list>Specifies the port's data transfer speed and mode. Does not use the
noform of the command. (Default:auto.)The 10/100 auto-negotiation feature allows a port to establish a link with a port at the other end at either 10 Mbps or 100 Mbps, using the highest mutual speed and duplex mode available. Only these speeds are allowed with this setting.
Examples:
To configure port C5 for auto-10-100, enter this command:
HP Switch(config)# int c5 speed-duplex auto-10-100
To configure ports C1 through C3 and port C6 for 100Mbps full-duplex, enter these commands:
HP Switch(config)# int c1-c3,c6 speed-duplex 100-full
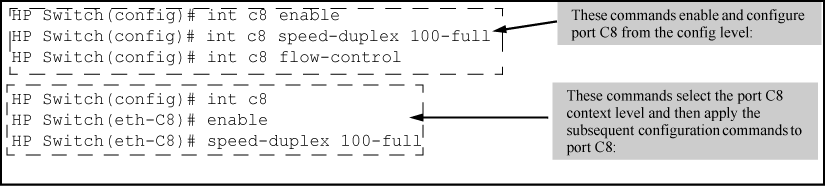
Similarly, to configure a single port with the above command settings, you could either enter the same command with only the one port identified or go to the context level for that port and then enter the command. For example, to enter the context level for port C6 and then configure that port for 100FDx:
HP Switch(config)# int e c6
HP Switch(eth-C6)# speed-duplex 100-full
If port C8 was disabled, and you wanted to enable it and configure it for 100FDx with flow-control active, you could do so with either of the following command sets:
For more on flow control, see Enabling or disabling flow control (CLI).
|
|
|
|
|
NOTE: You must enable flow control on both ports in a given link. Otherwise, flow control does not operate on the link and appears as |
|
|
To disable flow control on some ports, while leaving it enabled on other ports, just disable it on the individual ports you want to exclude.
(You can find more information on flow control in Status and parameters for each port type.)
Syntax:
Enables or disables flow control packets on the port. The
noform of the command disables flow control on the individual ports. (Default: Disabled.)
Examples:
Assuming that flow control is currently disabled on the switch, you would use these commands:
Configuring flow control for a series of ports
HP Switch(config)# int a1-a6 flow-control

HP Switch(config)# show interfaces brief

 Status and Counters - Port Status

                   | Intrusion                           MDI  Flow Bcast
  Port   Type      | Alert     Enabled Status Mode       Mode Ctrl Limit
  ------ --------- + --------- ------- ------ ---------- ---- ---- -----
  A1     10GbE-T   | No        Yes     Up     1000FDx    NA   on   0
  A2     10GbE-T   | No        Yes     Up     10GigFD    NA   on   0
  A3     10GbE-T   | No        Yes     Up     10GigFD    NA   on   0
  A4     10GbE-T   | No        Yes     Up     10GigFD    NA   on   0
  A5     10GbE-T   | No        Yes     Up     10GigFD    NA   on   0
  A6     10GbE-T   | No        Yes     Up     10GigFD    NA   on   0
  A7     10GbE-T   | No        Yes     Down   10GigFD    NA   off  0
  A8     10GbE-T   | No        Yes     Up     10GigFD    NA   off  0
Continued from Configuring flow control for a series of ports
HP Switch(config)# no int a5-a6 flow-control

HP Switch(config)# show interfaces brief

 Status and Counters - Port Status

                   | Intrusion                           MDI  Flow Bcast
  Port   Type      | Alert     Enabled Status Mode       Mode Ctrl Limit
  ------ --------- + --------- ------- ------ ---------- ---- ---- -----
  A1     10GbE-T   | No        Yes     Up     1000FDx    NA   on   0
  A2     10GbE-T   | No        Yes     Down   10GigFD    NA   on   0
  A3     10GbE-T   | No        Yes     Down   10GigFD    NA   on   0
  A4     10GbE-T   | No        Yes     Down   10GigFD    NA   on   0
  A5     10GbE-T   | No        Yes     Down   10GigFD    NA   off  0
  A6     10GbE-T   | No        Yes     Down   10GigFD    NA   off  0
  A7     10GbE-T   | No        Yes     Down   10GigFD    NA   off  0
  A8     10GbE-T   | No        Yes     Down   10GigFD    NA   off  0
Continued from Continued from Example 32
HP Switch(config)# no int a1-a4 flow-control

HP Switch(config)# show interfaces brief

 Status and Counters - Port Status

                   | Intrusion                           MDI  Flow Bcast
  Port   Type      | Alert     Enabled Status Mode       Mode Ctrl Limit
  ------ --------- + --------- ------- ------ ---------- ---- ---- -----
  A1     10GbE-T   | No        Yes     Down   1000FDx    NA   off  0
  A2     10GbE-T   | No        Yes     Down   10GigFD    NA   off  0
  A3     10GbE-T   | No        Yes     Down   10GigFD    NA   off  0
  A4     10GbE-T   | No        Yes     Down   10GigFD    NA   off  0
  A5     10GbE-T   | No        Yes     Down   10GigFD    NA   off  0
  A6     10GbE-T   | No        Yes     Down   10GigFD    NA   off  0
  A7     10GbE-T   | No        Yes     Down   10GigFD    NA   off  0
  A8     10GbE-T   | No        Yes     Down   10GigFD    NA   off  0
A LAN broadcast storm arises when an excessively high rate of broadcast packets flood the LAN. Occurrence of LAN broadcast storm disrupts traffic and degrades network performance. To prevent LAN traffic from being disrupted, an enhancement of fault-finder commands adds new options, and the corresponding MIBs, that trigger a port disablement when a broadcast storm is detected on that port.
Under this enhancement, the CLI commands given only supports broadcast traffic and not multicast and unicast types of traffic.
The waiting period range for re-enabling ports is 0 to 604800 seconds. The default waiting period to re-enable a port is zero which prevents the port from automatic re-enabling.
|
|
|
|
|
NOTE: Avoid port flapping when choosing the waiting period by considering the time to re-enable carefully. |
|
|
Use the following commands to configure the broadcast-storm on a port.
Syntax:
To remove the current configuration of broadcast-storm on a port, use:
Syntax:
Configuration examples:
HP Switch(config)# fault-finder broadcast-storm [ethernet] <A1> action [warn-and-disable <65535>]< percent 10>HP Switch(config)# fault-finder broadcast-storm [ethernet] <A2> action [warn-and-disable <pps 100>HP Switch(config)# fault-finder broadcast-storm [ethernet] <A22> action [warn] <pps 100>
Use the following command to display the broadcast-storm-control configuration.
Syntax:
Examples:
HP Switch# show fault-finder broadcast-storm [A1]
Port Bcast Storm Port Status Rising Threshold Action Disable Timer Disable Timer Left A1 Yes Down 10% warn-and-disable 65535 — HP Switch (config)# show fault-finder broadcast-storm
Port Bcast Storm Port Status Rising Threshold Action Disable Timer Disable Timer Left A1 Yes Down 200 pps warn-and-disable 10 9 HP Switch (config)# show fault-finder broadcast-storm A1
Port Bcast Storm Port Status Rising Threshold Action Disable Timer Disable Timer Left A1 No Up — none — — HP Switch (config)# show fault-finder broadcast-storm
SNMP support will be provided through the following MIB objects:
hpicfFfBcastStormControlPortConfig OBJECT IDENTIFIER
hpicfFfBcastStormControlPortConfigTable OBJECT-TYPE
-
syntax sequence: HpicfFfBcastStormControlPortConfigEntry
-
max-access: not-accessible
-
status: current
-
description: This table provides information about broadcast storm control configuration of all ports.
::= {hpicfFfBcastStormControlPortConfig 1}
hpicfFfBcastStormControlPortConfigEntry OBJECT-TYPE
-
syntax HpicfFfBcastStormControlPortConfigEntry
-
max-access: not-accessible
-
status: current
-
description: This object provides information about broadcast storm control configuration of each port.
-
index: {hpicfffbcaststormcontrolportindex}
::= {hpicfFfBcastStormControlPortConfigTable 1}
hpicfFfBcastStormControlPortConfigEntry ::=
-
Syntax sequence:
hpicfFfBcastStormControlPortIndex InterfaceIndex,
hpicfFfBcastStormControlMode Integer,
hpicfFfBcastStormControlRisingpercent Integer32,
hpicfFfBcastStormControlRisingpps Integer32,
hpicfFfBcastStormControlAction Integer,
hpicfFfBcastStormControlPortDisableTimer Unsigned32
hpicfFfBcastStormControlPortIndex OBJECT-TYPE
-
Syntax: Interfaceindex
-
max-access: not-accessible
-
status: current
-
description: The Index Value Which Uniquely Identifies A Row In The Interfaces Table.
::= {hpicfFfBcastStormControlPortConfigEntry 1}
hpicfFfBcastStormControlMode OBJECT-TYPE
-
Syntax Integer: disabled(1), Bcastrisinglevelpercent(2), Bcastrisinglevelpps(3)
-
max-access: read-write
-
status: current
-
description: The broadcast storm control mode of a port. A value of disable (1) indicates that no rising threshold value is set for broadcast storm traffic on this port. A value of bcastrisinglevelpercent (2) indicates that the rising threshold rate for broadcast storm traffic is configured in percentage of port bandwidth. A value of bcastrisinglevelpps (3) indicates that the rising threshold rate for broadcast storm traffic is configured in packets per second.
-
DEFVAL: disabled
::= {hpicfFfBcastStormControlPortConfigEntry 2}
hpicfFfBcastStormControlRisingpercent OBJECT-TYPE
-
Syntax Integer32 (1..100)
-
max-access: read-write
-
status: current
-
description: This Is The Rising Threshold Level in percent of bandwidth of the port. hpicfFfBcastStormControlAction occurs when broadcast traffic reaches this level.
::= {hpicfFfBcastStormControlPortConfigEntry 3}
hpicfFfBcastStormControlRisingpps OBJECT-TYPE
-
Syntax Integer32 (1..10000000)
-
max-access: read-write
-
status: current
-
description: This object indicates the rising threshold for broadcast storm control. This value is in packets-per-second of received broadcast traffic. hpicfffbcaststormcontrolaction object takes action when broadcast traffic reaches this level.
::= {hpicfFfBcastStormControlPortConfigEntry 4}
hpicfFfBcastStormControlAction OBJECT-TYPE
-
Syntax integer: none(1), warn(2), warnanddisable(3)
-
max-access: read-write
-
status: current
-
Description: This object defines the action taken by the switch when a broadcast storm occurs on a port. A value of none (1) indicates that no action is performed. A value of warn (2) indicates that an event is logged when broadcast traffic crosses the threshold value set on that port. A value of warn-and-disable (3) indicates that the port is disabled and an event is logged as soon as the broadcast traffic reaches the threshold value set on that port.
-
DEFVAL: none
::= {hpicfFfBcastStormControlPortConfigEntry 5}
hpicfFfBcastStormControlPortDisableTimer OBJECT-TYPE
-
Syntax Unsigned32 (0..604800)
-
Units: seconds
-
max-access: read-write
-
status: current
-
Description: This object specifies the time period for which the port remains in disabled state. A port is disabled when broadcast traffic reaches the threshold value set on that port. This time period is specified in seconds. The default value is zero which means that the port remains disabled and is not enabled again.
-
DEFVAL {0}
::= {hpicfFfBcastStormControlPortConfigEntry 6}
Copper ports on the switch can automatically detect the type of cable configuration (MDI or MDI-X) on a connected device and adjust to operate appropriately.
This means you can use a "straight-through" twisted-pair cable or a "crossover" twisted-pair cable for any of the connections—the port makes the necessary adjustments to accommodate either one for correct operation. The following port types on your switch support the IEEE 802.3ab standard, which includes the "Auto MDI/MDI-X" feature:
-
10/100-TX xl module ports
-
100/1000-T xl module ports
-
10/100/1000-T xl module ports
-
If you connect a copper port using a straight-through cable on a switch to a port on another switch or hub that uses MDI-X ports, the switch port automatically operates as an MDI port.
-
If you connect a copper port using a straight-through cable on a switch to a port on an end node—such as a server or PC—that uses MDI ports, the switch port automatically operates as an MDI-X port.
Auto-MDIX was developed for auto-negotiating devices, and was shared with the IEEE for the development of the IEEE 802.3ab standard. Auto-MDIX and the IEEE 802.3ab Auto MDI/MID-X feature are completely compatible. Additionally, Auto-MDIX supports operation in forced speed and duplex modes.
For more information on this subject, see the IEEE 802.3ab Standard Reference. For more information on MDI-X, see the Installation and Getting Started Guide for your switch.
If you require control over the MDI/MDI-X feature, you can set the switch to either of these non-default modes:
-
Manual MDI
-
Manual MDI-X
Cable types for auto and manual MDI/MDI-X settings shows the cabling requirements for the MDI/MDI-X settings.
Cable types for auto and manual MDI/MDI-X settings
|
Setting |
MDI/MDI-X device type |
|
|---|---|---|
|
PC or other MDI device type |
Switch, hub, or other MDI-X device |
|
|
Manual MDI |
Crossover cable |
Straight-through cable |
|
Manual MDI-X |
Straight-through cable |
Crossover cable |
|
Auto-MDI-X (the default) |
Either crossover or straight-through cable |
|
The AutoMDIX features apply only to copper port switches using twisted-pair copper Ethernet cables.
The auto-MDIX features apply only to copper port switches using twisted-pair copper Ethernet cables. For information about auto-MDIX, see Configuring auto-MDIX.
Syntax:
auto-mdixThe automatic,default setting. This configures the port for automatic detection of the cable (either straight-through or crossover).
mdiThe manual mode setting that configures the port for connecting to either a PC or other MDI device with a crossover cable, or to a switch, hub, or other MDI-X device with a straight-through cable.
mdixThe manual mode setting that configures the port for connecting to either a switch, hub, or other MDI-X device with a crossover cable, or to a PC or other MDI device with a straight-through cable.
Syntax:
Syntax:
Where a port is linked to another device, this command lists the MDI mode the port is currently using.
In the case of ports configured for
Auto(auto-mdix), the MDI mode appears as eitherMDIorMDIX, depending upon which option the port has negotiated with the device on the other end of the link.In the case of ports configured for
MDIorMDIX, the mode listed in this display matches the configured setting.If the link to another device was up, but has gone down, this command shows the last operating MDI mode the port was using.
If a port on a given switch has not detected a link to another device since the last reboot, this command lists the MDI mode to which the port is currently configured.
The show interfaces config displays the following data when port A1 is configured for auto-mdix, port A2 is configured for mdi, and port A3 is configured for mdix:
Displaying the current MDI configuration
HP Switch(config)# show interfaces config

 Port Settings

  Port   Type      | Enabled Mode         Flow Ctrl MDI
  ------ --------- + ------- ------------ --------- ----
  A1     10GbE-T   | Yes     Auto         Disable   Auto
  A2     10GbE-T   | Yes     Auto         Disable   MDI
  A3     10GbE-T   | Yes     Auto         Disable   MDIX
  A4     10GbE-T   | Yes     Auto         Disable   Auto
  A5     10GbE-T   | Yes     Auto         Disable   Auto
  A6     10GbE-T   | Yes     Auto         Disable   Auto
  A7     10GbE-T   | Yes     Auto         Disable   Auto
  A8     10GbE-T   | Yes     Auto         Disable   Auto
Displaying the current MDI operating mode
HP Switch(config)# show interfaces brief

 Status and Counters - Port Status

                   | Intrusion                           MDI  Flow Bcast
  Port   Type      | Alert     Enabled Status Mode       Mode Ctrl Limit
  ------ --------- + --------- ------- ------ ---------- ---- ---- -----
  A1     10GbE-T   | No        Yes     Up     1000FDx    MDIX off  0
  A2     10GbE-T   | No        Yes     Down   10GigFD    MDI  off  0
  A3     10GbE-T   | No        Yes     Down   10GigFD    MDIX off  0
  A4     10GbE-T   | No        Yes     Down   10GigFD    Auto off  0
  A5     10GbE-T   | No        Yes     Down   10GigFD    Auto off  0
  A6     10GbE-T   | No        Yes     Down   10GigFD    Auto off  0
  A7     10GbE-T   | No        Yes     Down   10GigFD    Auto off  0
  A8     10GbE-T   | No        Yes     Down   10GigFD    Auto off  0