-
Assign a local login (operator) and enable (manager) password.
At a minimum, HP recommends that you always assign at least a manager password to the switch. Otherwise, under some circumstances, anyone with Telnet, web, or serial port access could modify the switch configuration.
To configure local passwords:
You can configure both the operator and manager password with one command.
Syntax:
Configuring local passwords
HP Switch(config)# password all
New password for operator: ********
Please retype new password for operator: ********
New password for manager: *******
Please retype new password for manager: *******
-
Generate the switch public and private key pair.
A public and private host key pair must be generated on the switch. The switch uses this key pair along with a dynamically generated session key pair to negotiate an encryption method and session with an SSH client trying to connect to the switch.
The host key pair is stored in the switch flash memory, and only the public key in this pair is readable. The public key should be added to a "known hosts" file (for example,
$HOME/.ssh/known_hostson UNIX systems) on the SSH clients which should have access to the switch. Some SSH client applications automatically add the switch public key to a "known hosts" file. Other SSH applications require you to manually create a known hosts file and place the switch public key in the file. See the documentation for your SSH client application for more details.(The session key pair mentioned above is not visible on the switch. It is a temporary, internally generated pair used for a particular switch/client session, and then discarded.)
Because the host key pair is stored in flash instead of the running-config file, it is not necessary to
use write memoryto save the key pair. Erasing the key pair automatically disables SSH.Syntax:
Installs authentication files for ssh or https server, or for autorun.
Install RSA key for autorun. See "Configuring Autorun on the Switch" in the Management and Configuration Guide for more information.
Install RSA key for https certificate.
Use your SSL enabled browser to access the switch using the switch IP address or DNS name (if allowed by your browser). See the documentation provided with the browser application for more information.
Displays switch public key. Displays the version 1 and version 2 views of the key.
See SSH client public-key authentication for information about public keys saved in a configuration file.
[
babble]Displays hashes of the switch public key in phonetic format, see “Displaying the Public Key:”.
[
fingerprint]Displays fingerprints of the switch public key in hexadecimal format, see “Displaying the Public Key:”.
Example:
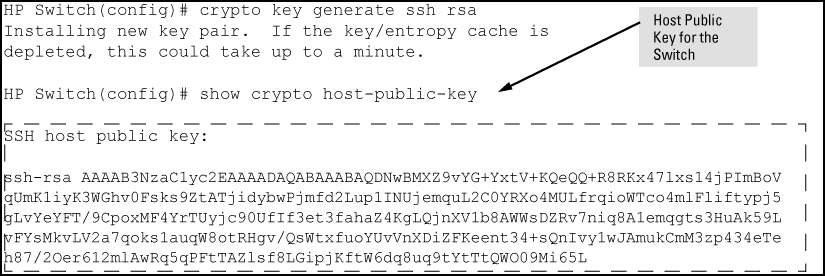
To generate and display a new key:
To compare the switch key to the key stored in your client's known-hosts file, note that the formatting and comments need not match.
![[NOTE: ]](images/note.gif)
NOTE: "Zeroizing" the switch key automatically disables SSH (sets
ip sshtono). Thus, if you zeroize the key and then generate a new key, you must also re-enable SSH with theip sshcommand before the switch can resume SSH operation.
Configuring key lengths:
The
crypto key generate sshcommand allows you to specify the type and length of the generated host key. The size of the host key is platform-dependent as different switches have different amounts of processing power. The size is represented by the <keysizekeysizeis not specified.RSA/DSA values for various HP networking switches
Platform Maximum RSA Key Size (in bits) DSA Key Size (in bits) 5400/3500/6200/8200/2900 1024, 2048, 3072
Default: 2048
1024 4200/2900/2810/2610/2510 1024, 2048
Default: 2048
1024 5300/2800/3400/2600 896 512 -
Provide the switch public key to clients.
When an SSH client contacts the switch for the first time, the client will challenge the connection unless you have already copied the key into the client's "known host" file. Copying the switch key in this way reduces the chance that an unauthorized device can pose as the switch to learn your access passwords. The most secure way to acquire the switch public key for distribution to clients is to use a direct, serial connection between the switch and a management device (laptop, PC, or UNIX workstation), as described below.
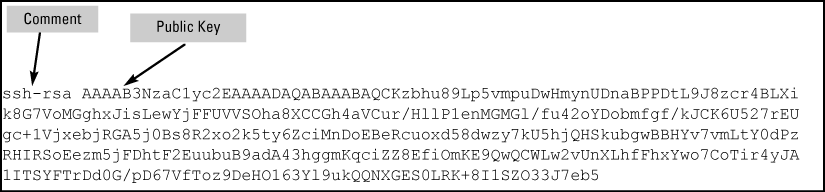
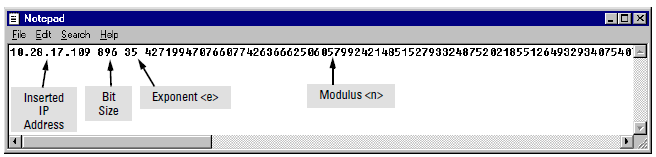
The public key generated by the switch consists of three parts, separated by one blank space each:
With a direct serial connection from a management station to the switch:
-
Use a terminal application such as HyperTerminal to display the switch public key with the
show crypto host public-keycommand, see Example of generating a public/private host key pair for the switch. -
Bring up the SSH client's "known host" file in a text editor such as Notepad as straight ASCII text, and copy the switch public key into the file.
-
Ensure that there are no changes or breaks in the text string. A public key must be an unbroken ASCII string. Line breaks are not allowed (changes in the line breaks will corrupt the Key.) For example, if you are using Windows® Notepad, ensure that
Word Wrap(in theEditmenu) is disabled, and that the key text appears on a single line. -
Add any data required by your SSH client application. For example, before saving the key to an SSH client's "known hosts" file you may have to insert the switch IP address:
For more on this topic, see the documentation provided with your SSH client application.
Displaying the Public Key:
The switch provides three options for displaying its public key. This is helpful if you need to visually verify that the public key the switch is using for authenticating itself to a client matches the copy of this key in the client's "known hosts" file:
-
Non-encoded ASCII numeric string:
Requires a client ability to display the keys in the "known hosts" file in the ASCII format. This method is tedious and error-prone due to the length of the keys. See Example of a correctly formatted public key.
-
Phonetic hash:
Outputs the key as a relatively short series of alphabetic character groups. Requires a client ability to convert the key to this format.
-
Hexadecimal hash:
Outputs the key as a relatively short series of hexadecimal numbers. Requires a parallel client ability.
For example, on the switch, generate the phonetic and hexadecimal versions of the switch public key as follows:
The two commands shown in Visual phonetic and hexadecimal conversions of the switch public key convert the displayed format of the switch (host) public key for easier visual comparison of the switch public key to a copy of the key in a client's "known host" file. The switch has only one RSA host key. The 'babble' and 'fingerprint' options produce two hashes for the key--one that corresponds to the challenge hash you will see if connecting with a v1 client, and the other corresponding to the hash you will see if connecting with a v2 client. These hashes do not correspond to different keys, but differ only because of the way v1 and v2 clients compute the hash of the same RSA key. The switch always uses an ASCII version of its public key, without babble or fingerprint conversion, for file storage and default display format.
-
-
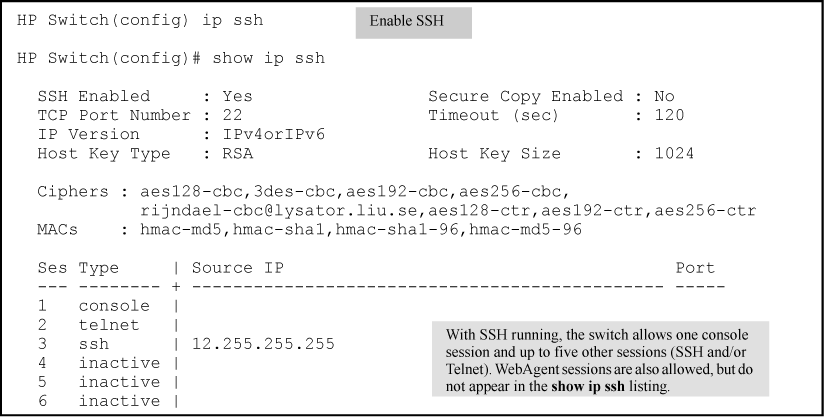
Enable SSH on the switch and anticipate SSH client contact behavior.
The
ip sshcommand enables or disables SSH on the switch, and modifies parameters the switch uses for transactions with clients. After you enable SSH, the switch can authenticate itself to SSH clients.
NOTE: Before enabling SSH on the switch you must generate the switch public/private key pair. If not yet done, see Generate the switch public and private key pair..
When configured for SSH, the switch uses its host public key to authenticate itself to SSH clients.For SSH clients to authenticate themselves to the switch, configure SSH on the switch for client public-key authentication at the login (operator) level. To enhance security also configure local, TACACS+, or RADIUS authentication at the enable (manager) level.
See Step 5.
SSH client contact behavior:
At the first contact between the switch and an SSH client, if the switch public key has not been copied into the client, then the client's first connection to the switch will question the connection and, for security reasons, provide the option of accepting or refusing. If it is safe to assume that an unauthorized device is not using the switch IP address in an attempt to gain access to the client's data or network, the connection can be accepted. (As a more secure alternative, the client can be directly connected to the switch serial port to download the switch public key into the client.)
Enabling SSH on the switch:
-
Generate a public/private key pair if you have not already done so. See Generate the switch public and private key pair..
Disabling SSH on the switch:
Perform either of the following:
-
Execute
no ip ssh. -
Zeroize the switch existing key pair, see “To generate or erase the switch public/private host key pair:” for more details.
Syntax:
[no]
ip sshEnables or disables SSH on the switch.
[cipher|<cipher-type>]Specify a cipher type to use for connection.
Valid types are:
-
aes128-cbc
-
3des-cbc
-
aes192-cbc
-
aes256-cbc
-
aes128-ctr
-
aes192-ctr
-
aes256-ctr
Default: All cipher types are available.
Use the
noform of the command to disable a cipher type.[
filetransfer]Enable/disable secure file transfer capability. SCP and SFTP secure file transfer will not function unless SSH is also enabled.
[ip-version <4|6|4or6>]Select the IP mode to run in. The mode "ip-version 4" only accepts connections from IPv4 clients. The mode "ip-version 6" only accepts connections from IPv6 clients. The mode "ip-version 4or6" accepts connections from both IPv4 and IPv6 clients.
Default: ip-version 4 or 6
[mac <mac–type>]Allows configuration of the set of MACs that can be selected. Valid types are:
-
hmac-md5
-
hmac-sha1
-
hmac-sha1-96
-
hmac-md5-96
Default: All MAC types are available.
Use the
noform of the command to disable a MAC type.[port <1-65535|default>][timeout <5-120>]Sets the maximum length of time (in seconds) allowed for initial protocol negotiation and authentication.
Default: 120 seconds
-
-
-
Configure the switch for SSH authentication.
Note that all methods in this section result in authentication of the switch public key by an SSH client. However only Option B below results in the switch also authenticating the client's public key. Also, for a more detailed discussion of the topics in this section, see SSH client public-key authentication notes.
NOTE: HP recommends that you always assign a manager-level (enable) password to the switch. Without this level of protection, any user with Telnet, web, or serial port access to the switch can change the switch configuration. If you configure only an operator password, entering the operator password through telnet, web, ssh or serial port access enables full manager privileges. See Assign a local login (operator) and enable (manager) password..
Option A: Configuring SSH access for password-only SSH authentication:
When configured with this option, the switch uses its public key to authenticate itself to a client, but uses only passwords for client authentication.
Syntax:
Configures a password method for the primary and secondary login (operator) access. If you do not specify an optional secondary method, it defaults to
none. If the primary method islocal, the secondary method must benone.Configures a password method for the primary and secondary enable (manager) access. If you do not specify an optional secondary method, it defaults to none. If the primary method is
local, the secondary method must benone.Option B: Configuring the switch for client Public-Key SSH authentication
If configured with this option, the switch uses its public key to authenticate itself to a client, but the client must also provide a client public key for the switch to authenticate. This option requires the additional step of copying a client public-key file from a TFTP or SFTP server into the switch. This means that before you can use this option, you must:
-
Copy the client's public key into a public-key file (which can contain up to 10 client public keys.)
-
Copy the public-key file into a TFTP or SFTP server accessible to the switch and download the file to the switch.
For more on these topics, see SSH client public-key authentication notes.
With steps a-c complete and SSH properly configured on the switch, if an SSH client contacts the switch, login authentication automatically occurs first, using the switch and client public keys. After the client gains login access, the switch controls client access to the manager level by requiring the passwords configured earlier by the
aaa authentication ssh enablecommand.Syntax:
Configures the switch to authenticate a client public key at the login level with an optional secondary password method.
Syntax:
Configures a password method for the primary and secondary enable (manager) access. If you do not specify an optional secondary method, it defaults to
none.If the primary access method is
local, you can only specifynonefor a secondary access method.
NOTE: The configuration of SSH clients' public keys is stored in flash memory on the switch. You also can save SSH client public-key configurations to a configuration file by entering the following commands:
include-credentialswrite memory
For more information about saving security credentials to a configuration file, see Saving security credentials in a config file.
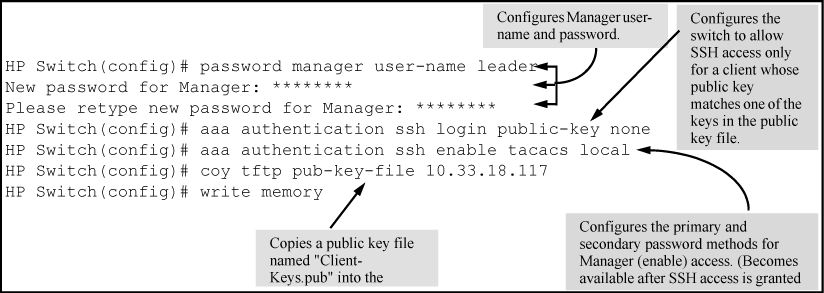
Example:
Assume you have a client public-key file named Client-Keys.pub (on a TFTP server at 10.33.18.117) ready for downloading to the switch. For SSH access to the switch allow only clients having a private key that matches a public key found in Client-Keys.pub. For manager-level (enable) access for successful SSH clients use TACACS+ for primary password authentication and
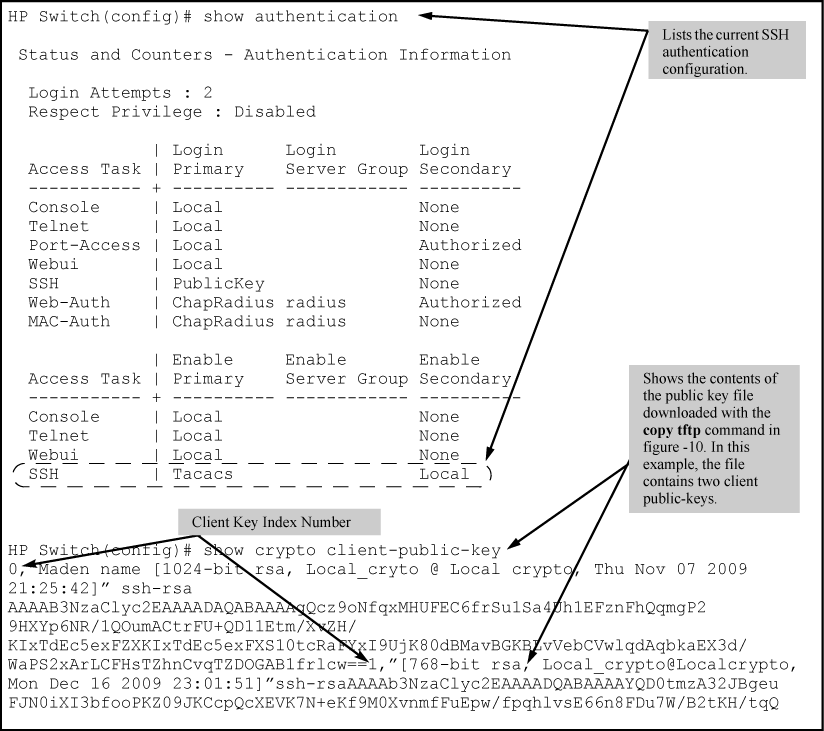
localfor secondary password authentication, with a manager username of "1eader" and a password of "m0ns00n". To set up this operation, configure the switch in a manner similar to the following:SSH configuration and client public-key listing from figure shows how to check the results of the above commands.
-
Use an SSH client to access the switch.
Test the SSH configuration on the switch to ensure that you have the level of SSH operation needed for the switch. If you have problems, see "RADIUS-related problems" in the Management and Configuration Guide for your switch.


![[CAUTION: ]](images/caution.gif)