Web authentication using the RADIUS authentication server
Network requirements
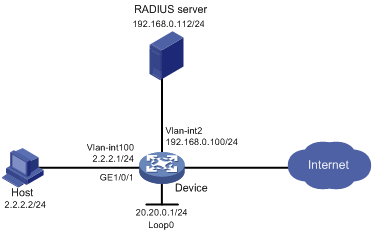
As shown in Figure 168, the host is connected to the device through GigabitEthernet 1/0/1.
Configure Web authentication to meet the following requirements:
The device performs Web authentication for users by using a RADIUS server.
The device pushes customized Web authentication pages to users and use HTTP to transfer the authentication data.
Figure 167: Network diagram
Configuration prerequisites
Assign IP addresses to the host, the device, and the RADIUS server as shown in Figure 168 and make sure they can reach each other.
Configure the RADIUS server properly to provide authentication and accounting functions for users. In this example, the username is configured as user1 on the RADIUS server.
Customize the authentication pages, compress them to a file, and upload the file to the root directory of the storage medium of the switch. In this example, the file is abc.zip.
Configuration procedure
Create VLANs, assign IP addresses to the VLAN interfaces, and assign interfaces to the VLANs. (Details not shown.)
Configure a RADIUS scheme:
# Create a RADIUS scheme named rs1.
<Device> system-view
[Device] radius scheme rs1
# Specify the primary authentication server and primary accounting server, and configure the keys for communication with the servers.
[Device-radius-rs1] primary authentication 192.168.0.112
[Device-radius-rs1] primary accounting 192.168.0.112
[Device-radius-rs1] key authentication simple radius
[Device-radius-rs1] key accounting simple radius
# Exclude the ISP domain name from the username sent to the RADIUS server.
[Device-radius-rs1] user-name-format without-domain
[Device-radius-rs1] quit
Configure an authentication domain:
# Create an ISP domain named dm1.
[Device] domain dm1
# Configure AAA methods for the ISP domain
[Device-isp-dm1] authentication portal radius-scheme rs1
[Device-isp-dm1] authorization portal radius-scheme rs1
[Device-isp-dm1] accounting portal radius-scheme rs1
[Device-isp-dm1] quit
Configure a local portal Web server:
# Configure a local port Web server to use HTTP to exchange authentication information with clients.
[Device] portal local-web-server http
# Specify the file abc.zip as the default authentication page file for the local portal Web server. (This file must exist in the directly root directory of the storage medium.)
[Device-portal-local-websvr-http] default-logon-page abc.zip
# Specify 80 as the port number listened by the portal Web server for HTTP.
[Device–portal-local-websvr-http] tcp-port 80
[Device-portal-local-websvr-http] quit
Configure Web authentication:
# Create Web authentication server named user.
[Device] web-auth server user
# Specify http://20.20.0.1/portal/ as the redirection URL for the Web authentication server.
[Device-web-auth-server-user] url http://20.20.0.1/portal/
# Specify the IP address of the Web authentication server as 20.20.0.1 (the IP address of Loopback 0) and the port number as 80.
[Device-web-auth-server-user] ip 20.20.0.1 port 80
[Device-web-auth-server-user] quit
# Specify domain dml as the Web authentication domain.
[Device] interface gigabitethernet 1/0/1
[Device-GigabitEthernet1/0/1] web-auth domain dm1
# Enable Web authentication by using Web authentication server user.
[Device-GigabitEthernet1/0/1] web-auth enable apply server user
[Device-GigabitEthernet1/0/1] quit
Verifying the configuration
# Display Web authentication user information after user user1 passes Web authentication.
<Device> display web-auth user
  Online web-auth users: 1

User Name: user1
  MAC address: acf1-df6c-f9ad
  Access interface: GigabitEthernet1/0/1
  Initial VLAN: 1
  Authorization VLAN: N/A
  Authorization ACL ID: N/A
  Authorization user profile: N/A