Publickey authentication enabled Stelnet server configuration example
Network requirements
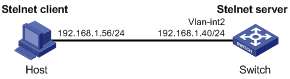
As shown in Figure 104, the switch acts as the Stelnet server, and it uses publickey authentication and the RSA public key algorithm.
Establish an Stelnet connection between the host and the switch, so that you can log in to the switch to configure and manage the switch.
Figure 103: Network diagram
Configuration procedure
In the server configuration, the client's host public key is required. Use the client software to generate RSA key pairs on the client before configuring the Stelnet server.
There are different types of Stelnet client software, such as PuTTY and OpenSSH. This example uses an Stelnet client that runs PuTTY version 0.58.
The configuration procedure is as follows:
Generate RSA key pairs on the Stelnet client:
Run PuTTYGen.exe on the client, select SSH-2 RSA and click Generate.
Figure 104: Generating a key pair on the client
On the page shown in Figure 107, click Save private key to save the private key.
A confirmation dialog box appears.
Click Yes.
A file saving window appears.
Enter a file name (private.ppk in this example), and click Save.
Transmit the public key file to the server through FTP or TFTP. (Details not shown.)

Continue moving the mouse during the key generating process, but do not place the mouse over the green progress bar shown in Figure 106. Otherwise, the progress bar stops moving and the key pair generating progress stops.
Figure 105: Generating process
On the page shown in Figure 107, click Save private key to save the private key.
A confirmation dialog box appears.
Click Yes.
A file saving window appears.
Enter a file name (private.ppk in this example), and click Save.
Transmit the public key file to the server through FTP or TFTP. (Details not shown.)

After the key pair is generated, click Save public key to save the public key.
A file saving window appears.
Figure 106: Saving a key pair on the client
On the page shown in Figure 107, click Save private key to save the private key.
A confirmation dialog box appears.
Click Yes.
A file saving window appears.
Enter a file name (private.ppk in this example), and click Save.
Transmit the public key file to the server through FTP or TFTP. (Details not shown.)

Enter a file name (key.pub in this example), and click Save.
On the page shown in Figure 107, click Save private key to save the private key.
A confirmation dialog box appears.
Click Yes.
A file saving window appears.
Enter a file name (private.ppk in this example), and click Save.
Transmit the public key file to the server through FTP or TFTP. (Details not shown.)
Configure the Stelnet server:
# Generate RSA key pairs.
<Switch> system-view
[Switch] public-key local create rsa
The range of public key modulus is (512 ~ 2048).
If the key modulus is greater than 512, it will take a few minutes.
Press CTRL+C to abort.
Input the modulus length [default = 1024]:
Generating Keys...
........................++++++
...................++++++
..++++++++
............++++++++
Create the key pair successfully.
# Generate a DSA key pair.
[Switch] public-key local create dsa
The range of public key modulus is (512 ~ 2048).
If the key modulus is greater than 512, it will take a few minutes.
Press CTRL+C to abort.
Input the modulus length [default = 1024]:
Generating Keys...
.++++++++++++++++++++++++++++++++++++++++++++++++++*
........+......+.....+......................................+
...+.................+..........+...+
Create the key pair successfully.
# Generate an ECDSA key pair.
[Switch] public-key local create ecdsa secp256r1
Generating Keys...
.
Create the key pair successfully.
# Enable the Stelnet server.
[Switch] ssh server enable
# Assign an IP address to VLAN-interface 2. The Stelnet client uses this IP address as the destination for SSH connection.
[Switch] interface vlan-interface 2
[Switch-Vlan-interface2] ip address 192.168.1.40 255.255.255.0
[Switch-Vlan-interface2] quit
# Set the authentication mode to AAA for user lines.
[Switch] line vty 0 63
[Switch-line-vty0-63] authentication-mode scheme
[Switch-line-vty0-63] quit
# Import the client's public key from the public key file key.pub and name it switchkey.
[Switch] public-key peer switchkey import sshkey key.pub
# Create an SSH user named client002. Specify the authentication method as publickey for the user, and assign the public key switchkey to the user.
[Switch] ssh user client002 service-type stelnet authentication-type publickey assign publickey switchkey
# Create a local device management user named client002.
[Switch] local-user client002 class manage
# Authorize local user client002 to use the SSH service.
[Switch-luser-manage-client002] service-type ssh
# Assign the network-admin user role to local user client002.
[Switch-luser-manage-client002] authorization-attribute user-role network-admin
[Switch-luser-manage-client002] quit
Specify the private key file and establish a connection to the Stelnet server:
Launch PuTTY.exe on the Stelnet client to enter the interface shown in Figure 108.
In the Host Name (or IP address) field, enter the IP address of the Stelnet server 192.168.1.40.
Figure 107: Specifying the host name (or IP address)
Specify the Preferred SSH protocol version as 2.
Figure 108: Specifying the preferred SSH version
Click Browse… to bring up the file selection window, navigate to the private key file (private.ppk in this example), and click OK.
Figure 109: Specifying the private key file

Select Connection > SSH from the navigation tree.
The window shown in Figure 109 appears.
Specify the Preferred SSH protocol version as 2.
Figure 108: Specifying the preferred SSH version
Click Browse… to bring up the file selection window, navigate to the private key file (private.ppk in this example), and click OK.
Figure 109: Specifying the private key file

Select Connection > SSH > Auth from the navigation tree.
The window shown in Figure 110 appears.
Click Browse… to bring up the file selection window, navigate to the private key file (private.ppk in this example), and click OK.
Figure 109: Specifying the private key file

Click Open to connect to the server.
If the connection is successfully established, the system notifies you to enter the username. After entering the username (client002), you can enter the CLI of the server.