AAA for SSH users by an HWTACACS server
Network requirements
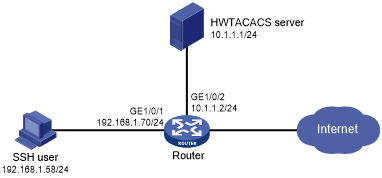
As shown in Figure 16, configure the router to meet the following requirements:
Use the HWTACACS server for SSH user authentication, authorization, and accounting.
Assign the default user role network-operator to SSH users after they pass authentication.
Exclude domain names from the usernames sent to the HWTACACS server.
Use expert as the shared keys for secure HWTACACS communication.
Figure 15: Network diagram
Configuration procedure
Configure the HWTACACS server:
# Set the shared keys to expert for secure communication with the router. (Details not shown.)
# Add an account for the SSH user and specify the password. (Details not shown.)
Configure the router:
# Create an HWTACACS scheme.
<Router> system-view
[Router] hwtacacs scheme hwtac
# Specify the primary authentication server.
[Router-hwtacacs-hwtac] primary authentication 10.1.1.1 49
# Specify the primary authorization server.
[Router-hwtacacs-hwtac] primary authorization 10.1.1.1 49
# Specify the primary accounting server.
[Router-hwtacacs-hwtac] primary accounting 10.1.1.1 49
# Set the shared keys to expert in plaintext form for secure HWTACACS communication.
[Router-hwtacacs-hwtac] key authentication simple expert
[Router-hwtacacs-hwtac] key authorization simple expert
[Router-hwtacacs-hwtac] key accounting simple expert
# Exclude domain names from the usernames sent to the HWTACACS server.
[Router-hwtacacs-hwtac] user-name-format without-domain
[Router-hwtacacs-hwtac] quit
# Create an ISP domain and configure the domain to use the HWTACACS scheme for authentication, authorization, and accounting of login users.
[Router] domain bbb
[Router-isp-bbb] authentication login hwtacacs-scheme hwtac
[Router-isp-bbb] authorization login hwtacacs-scheme hwtac
[Router-isp-bbb] accounting login hwtacacs-scheme hwtac
[Router-isp-bbb] quit
# Create local RSA and DSA key pairs.
[Router] public-key local create rsa
[Router] public-key local create dsa
# Enable the SSH service.
[Router] ssh server enable
# Enable the default user role feature to assign authenticated SSH users the default user role network-operator.
[Router] role default-role enable
# Enable scheme authentication for user lines VTY 0 through VTY 63.
[Router] line vty 0 63
[Router-line-vty0-63] authentication-mode scheme
[Router-line-vty0-63] quit
# Configure the IP address of interface GigabitEthernet 1/0/1, through which the SSH user accesses the router.
[Router] interface gigabitethernet 1/0/1
[Router-GigabitEthernet1/0/1] ip address 192.168.1.70 255.255.255.0
[Router-GigabitEthernet1/0/1] quit
# Configure the IP address of interface GigabitEthernet 1/0/2, through which the router is connected to the server.
[Router] interface gigabitethernet 1/0/2
[Router-GigabitEthernet1/0/2] ip address 10.1.1.2 255.255.255.0
[Router-GigabitEthernet1/0/2] quit
Verifying the configuration
# Initiate an SSH connection to the router, and enter the correct username and password. The user logs in to the router. (Details not shown.)
# Verify that the user can use the commands permitted by the network-operator user role. (Details not shown.)