MXDM displays a list of available systems in
My Systems.
Select a system from
My Systems.
Expand a selected system in the navigation tree.
List of catalogs for the selected system appears.
Select a catalog and then expand
Schemas folder within it.
List of schemas appears.
Expand a selected schema and select
Tables folder.
Expand the
Tables folder.
List of tables appears.
Select and expand a table within it.
Indexes and
Triggers folders appear.
Right-click on the
Indexes folder for that table or a table and select
Create Index context menu.
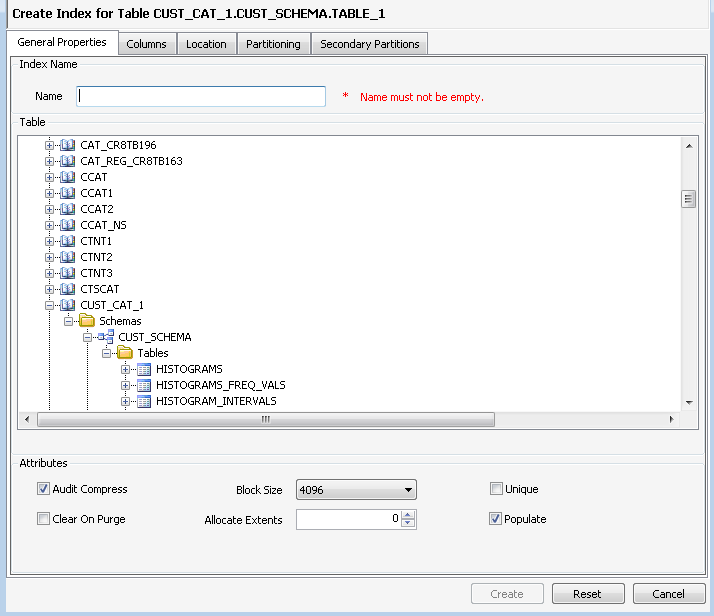
Create Index wizard launches with the
General Properties tab as the default selection.
Create Index wizard
In the
General Properties tab, enter the name of the index to be created. Index will be created for the table that is currently selected in the Table tree.
Set the following index attributes:
Audit Compress
Block Size
Unique
Clear On Purge
Allocate Extents
Populate
Click
Columns tab.
In the
Columns tab, select columns from the
Columns Available grid and click
Add.
The selected columns get moved to the
Columns in Index grid.
On the right grid, select columns from the
Columns in Index grid and click
Remove.
The selected columns get moved to the
Columns Available grid.
In the
Columns in Index grid, select
Ascending check box for columns to sort the resulting index in ascending order.
In the
Columns in Index grid, select one or more columns and click
Move Up or
Move Down button to change the position of those columns.
Click
Location tab.
Location tab displays local node and the remote nodes connected through expand to local node in
System list. In the
Location tab:
Select a system name from the system drop down.
Specify the following attributes as needed:
Volume Name — This is the data volume on which the primary partition of the index will be created.
Primary Extent Size — This attribute specifies the size of the primary extent in pages.
Secondary Extent Size — This attribute specifies the size of the secondary extents in pages.
Max extents — This attribute specifies the maximum number of extents.
Name — This attribute specifies whether SQL/MX selects a name of the partition or is user defined.
Location— This attribute specifies whether SQL/MX selects the file name or is user defined.
Click
Partitioning to specify whether or not the index has secondary partitions.
In the
Partitioning tab:
Select
Range Partition or
Hash Partition and add a secondary partition in
Secondary Partitions.
Select
By Columns check box to create partition using specific columns.
Move the columns from the
Columns Available list to
Partition By Columns list.
Click the
Move Up and
Move Down buttons to change the order of the columns in the
Partition By Columns list.
Click
Secondary Partitions tab to add secondary partitions.
In the
Secondary Partitions tab:
Click
Add to launch
Specify Partition dialog. In the
Specify Partition dialog, specify the node where the partition resides, volume, extentt sizes, name of the partition, and location.
Based on the value of the
Partitions per volume field, the specified number of partitions will be added to the partitions list.
Specify the first key value for the partition being created. The
First Key Value field will not be displayed if
Hash Partitioning was specified in the
Partitions tab.
To specify the first key value for a partition, select the corresponding partition row, type the first key value and then click
Apply.
Click
Reload to copy the first key value of the selected partition row to the
First Key Value field.
Click
Remove to remove the partition rows that are selected.
Click
Edit to launch the
Specify Partition dialog, modify the node where the partition resides, volume, extent sizes, name of the partition, and location.