Viewing and configuring a static trunk group (Menu)
IMPORTANT:
Configure port trunking
before you connect the trunked links to another switch, routing switch, or server. Otherwise, a broadcast storm could occur. (If you need to connect the ports before configuring them for trunking, you can temporarily disable the ports until the trunk is configured. See "Enabling or Disabling Ports and Configuring Port Mode".)
This procedure uses the Port/Trunk Settings screen to configure a static port trunk group on the switch.
Procedure
Follow the procedures in the preceding IMPORTANT note.
From the Main Menu, select:
2. Switch Configuration…
2. Port/Trunk Settings
Press
[E] (for
Edit) and then use the arrow keys to access the port trunk parameters.
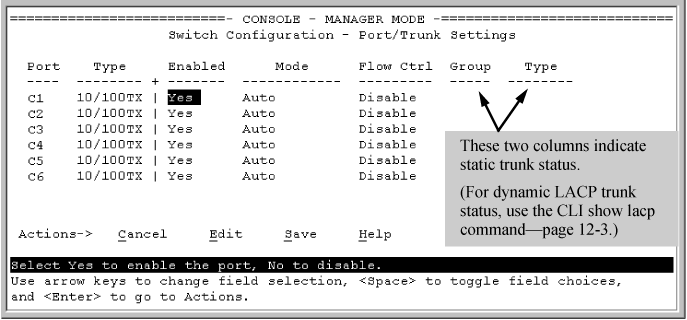
Example: of the menu screen for configuring a port trunk group
In the Group column, move the cursor to the port you want to configure.
Use the Space bar to choose a trunk group assignment (Trk1,
Trk2, and so on) for the selected port.
For proper trunk operation, all ports in a trunk must have the same media type and mode (such as 10/100TX set to 100FDx, or 100FX set to 100FDx). The flow control settings must also be the same for all ports in a given trunk. To verify these settings, see "Viewing Port Status and Configuring Port Parameters".
You can configure the trunk group with up to eight ports per trunk. If multiple VLANs are configured, all ports within a trunk will be assigned to the same VLAN or set of VLANs. (With the 802.1Q VLAN capability built into the switch, more than one VLAN can be assigned to a trunk. See the "Static Virtual LANs (VLANs)" in the
advanced traffic management guide for your switch.)
(To return a port to a non-trunk status, keep pressing the Space bar until a blank appears in the highlighted Group value for that port.)
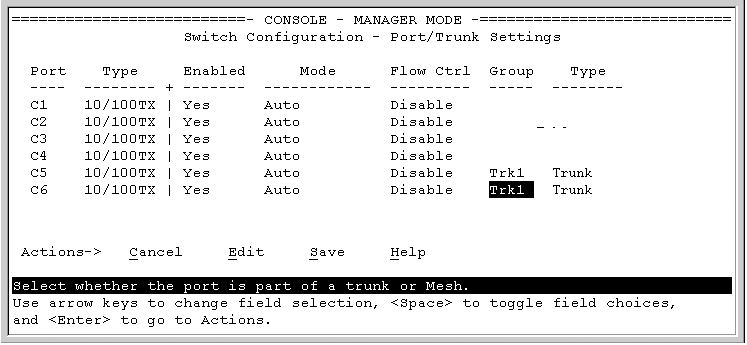
Example: of the Configuration for a Two-Port Trunk Group
Move the cursor to the Type column for the selected port and use the Space bar to select the trunk type:
LACP
Trunk (the default type if you do not specify a type)
All ports in the same trunk group on the same switch must have the same Type (LACP or
Trunk).
When you are finished assigning ports to the trunk group, press
[Enter], then
[S] (for
Save) and return to the Main Menu. (It is not necessary to reboot the switch.)
During the Save process, traffic on the ports configured for trunking is delayed for several seconds. If the Spanning Tree Protocol is enabled, the delay may be up to 30 seconds.
Connect the trunked ports on the switch to the corresponding ports on the opposite device. If you previously disabled any of the trunked ports on the switch, enable them now. (See "Viewing Port Status and Configuring Port Parameters")
Check the Event Log ("Using the Event Log for Troubleshooting Switch Problems") to verify that the trunked ports are operating properly.