Screen structure and navigation

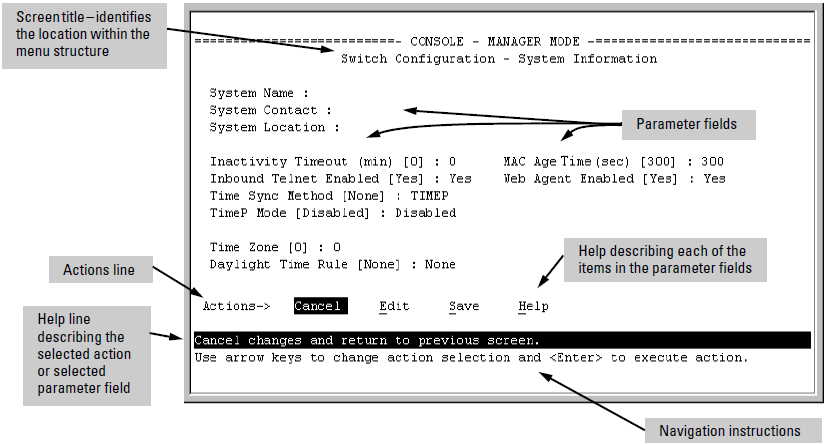
Menu interface screens include these three elements:

  • Parameter fields and/or read-only information such as statistics

  • Navigation and configuration actions, such as Save, Edit, and Cancel

  • Help line to describe navigation options, individual parameters, and read-only data

For example, in the following System Information screen:

Elements of the screen structure

"Forms" design. The configuration screens, in particular, operate similarly to a number of PC applications that use forms for data entry. When you first enter these screens, you see the current configuration for the item you have selected. To change the configuration, the basic operation is to:

  1. Press [E] to select the Edit action.

  2. Navigate through the screen making all the necessary configuration changes.

  3. Press [Enter] to return to the Actions line. From there, you can save the configuration changes or cancel the changes. Cancel returns the configuration to the values you saw when you first entered the screen.

How to navigate the Menu interface

Task:

Actions:

Execute an action from the "Actions –>" list at the bottom of the screen:


Reconfigure (edit) a parameter setting or a field:

  1. Select a configuration item, such as System Name.

  2. Press [E](for Edit on the Actions line).

  3. Use [[Tab]] or the arrow keys ([], [], [], or []) to highlight the item or field.

  4. Do one of the following:
    • If the parameter has preconfigured values, either use the Space bar to select a new option or enter the first part of your selection and the rest of the selection appears automatically. (The help line instructs you to "Select" a value.)

    • If there are no preconfigured values, type in a value (the Help line instructs you to "Enter" a value).

  5. If you want to change another parameter value, return to step 3.

  6. If you are finished editing parameters in the displayed screen, press [Enter] to return to the Actions line and do one of the following:
    • To save and activate configuration changes, press [S] (for the Save action). This saves the changes in the startup configuration and also implements the change in the currently running configuration. (See, "Switch Memory and Configuration".)

    • To exit from the screen without saving any changes that you have made (or if no changes are done), press [C] (for the Cancel action).

    Note: In the menu interface, executing Save activates most parameter changes and saves them in the startup configuration (or flash) memory, and it is therefore not necessary to reboot the switch after making these changes. But, if an asterisk appears next to any menu item you reconfigure, the switch will not activate or save the change for that item until you reboot the switch. In this case, rebooting must be done after you have made all desired changes and then returned to the Main Menu.
  7. When you finish editing parameters, return to the Main Menu.

  8. If necessary, reboot the switch by highlighting Reboot Switch in the Main Menu and pressing [Enter]. (See the Note in Step 6.)

Exit from a read-only screen.

Press [B] (for the Back action).

To get Help on individual parameter descriptions. In most screens, there is a Help option in the Actions line. Whenever any of the items in the Actions line are highlighted, press [H], and a separate help screen is displayed.

To get Help on the actions or data fields in each screen: Use the arrow keys ([], [], [], or []) to select an action or data field. The help line under the Actions items describes the currently selected action or data field.

For guidance on how to navigate in a screen: See the instructions provided at the bottom of the screen, or See Screen structure and navigation.)